
The Homelab Bench is reader-supported. As an Amazon Associate we earn from qualifying purchases; this article contains affiliate links.
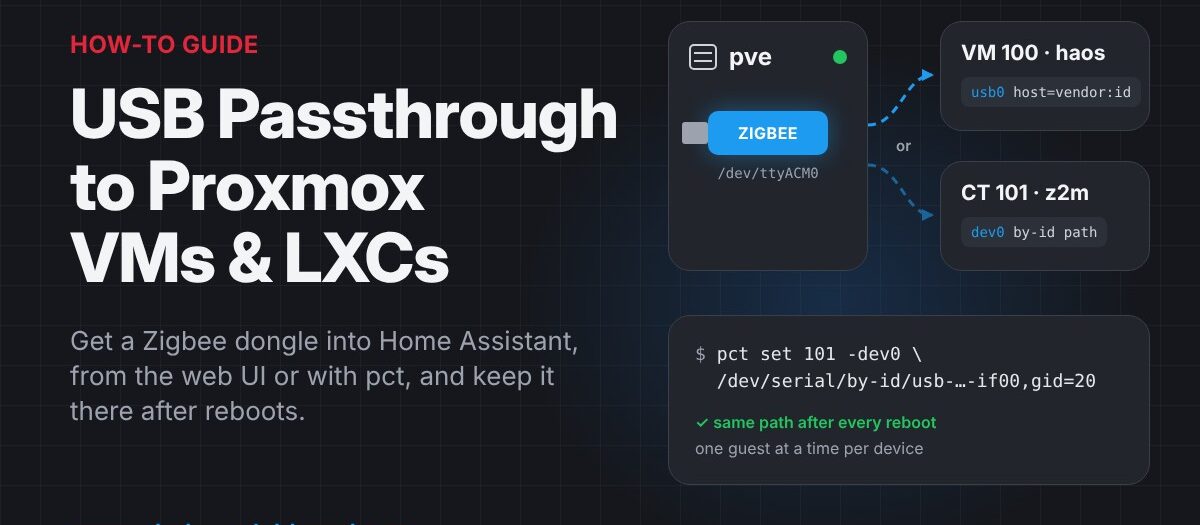
This guide shows you how to hand a physical USB device on your Proxmox host, usually a Zigbee or Z-Wave dongle, to a single virtual machine or LXC container so Home Assistant (or anything else) can use it as if it were plugged straight in. You will do it both ways: through the web UI or qm set for a VM, and through the Resources tab or pct set for a container, with a path that keeps working after reboots.
Every screenshot below comes from a real Proxmox VE 9.2 host. Its Home Assistant OS VM has the host’s built-in Bluetooth adapter passed through, and a Zigbee2MQTT container uses a Home Assistant Connect ZBT-2 Zigbee coordinator.
Before You Start
- Proxmox VE 8.2 or later. The container device passthrough feature (
dev0,dev1and so on) arrived in 8.1 as a command-line option, and 8.2 added it to the web UI. Proxmox VE 9.x has both. - A VM or container already created. If you have not got that far yet, start with Creating Your First VM and LXC Container in Proxmox.
- The USB device plugged into the Proxmox host itself, not into the PC you are browsing from.
- A shell on the host: either SSH, or click your node in the left-hand tree and then Shell.
One rule to keep in mind throughout: a USB device can only be used by one guest at a time. If your dongle is already assigned to a VM, remove it there before giving it to a container, and vice versa.
A note on the dongle and cable
Any USB Zigbee coordinator works with the steps below. A popular budget choice is the Sonoff ZBDongle-E, which uses a Silicon Labs EFR32MG21 radio and ships with EmberZNet coordinator firmware, so it works with both ZHA and Zigbee2MQTT without flashing anything first.
Check price: Amazon UK | Amazon US | Amazon IE
Whatever dongle you use, put it on a short USB 2.0 extension cable rather than plugging it straight into the host. USB 3.0 ports and cables give off interference in the same 2.4 GHz band Zigbee uses, and a mini PC’s metal case blocks signal as well. Moving the stick 50 cm or so away from both is the cheapest Zigbee reliability fix there is.
Check price: Amazon UK | Amazon US | Amazon IE
Step 1: Find the Device on the Host
Open a shell on the Proxmox host and run these two commands:
lsusb
ls -l /dev/serial/by-id/
lsusb lists every USB device the host can see, with a vendor:product ID in the form 303a:831a. You need that ID for the VM method. The second command lists stable names for USB serial devices such as Zigbee and Z-Wave sticks. You need that path for the container method.
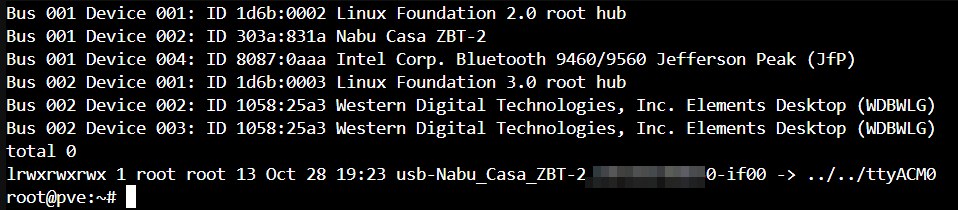
For reference, a Sonoff ZBDongle-E normally appears as 1a86:55d4 with a by-id name starting usb-ITEAD_SONOFF_Zigbee_3.0_USB_Dongle_Plus_V2_, and the older ZBDongle-P appears as 10c4:ea60 (a Silicon Labs CP210x serial chip). If you are not sure which line is your dongle, unplug it, run lsusb again and see which line disappears.
Why bother with /dev/serial/by-id/? Names like /dev/ttyACM0 and /dev/ttyUSB0 are handed out in the order devices are detected, so they can swap around if you add a second serial device. The by-id name is built from the device’s own manufacturer, model and serial number, so it stays the same.
Part 1: USB Passthrough to a VM
VMs get an emulated USB controller, and Proxmox attaches your real device to it. This is all point-and-click.
Step 2: Add a USB Device in the Hardware Tab
- Click your VM in the left-hand tree. For most readers that is the Home Assistant OS VM from our guide to installing Home Assistant in a Proxmox VM.
- Click Hardware, then Add > USB Device.
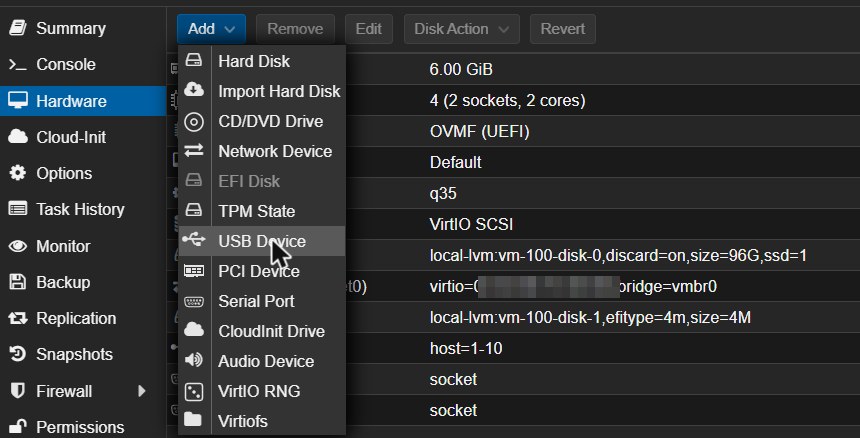
The dialog gives you four choices:
- Spice Port: for forwarding USB from the PC running a SPICE remote console. Not what you want here.
- Use mapped Device: uses a device you have defined under Datacenter > Resource Mappings. Mainly useful in a cluster (more on that below).
- Use USB Vendor/Device ID: passes through whichever device matches that ID, whichever port it is in. This is the right choice for a single Zigbee or Z-Wave dongle.
- Use USB Port: passes through whatever is plugged into one physical port.
Select Use USB Vendor/Device ID and open the Choose Device drop-down. Proxmox lists everything the host currently sees, with manufacturer and product names, so you can pick your dongle without typing the ID.
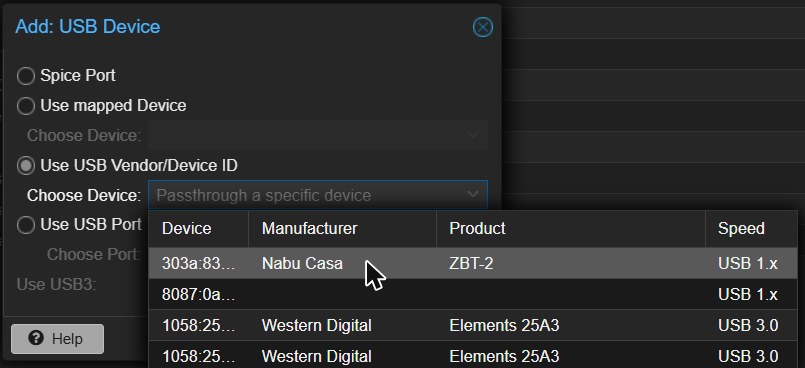
That screenshot also shows the one case where the ID method falls down: two identical devices. Both WD Elements drives report 1058:25a3, so an ID can’t tell them apart. For identical devices, use Use USB Port instead and leave each one plugged into the same port.
Leave Use USB3 unticked for a Zigbee or Z-Wave stick, since they are slow USB 2.0 devices. Tick it for USB 3 devices such as external drives or capture cards. Then click Add.
The same thing from the host shell (replace 100 with your VM’s ID and the ID with yours):
qm set 100 -usb0 host=303a:831aStep 3: Apply the Change
With Proxmox’s default settings, USB devices can be hot-plugged into a running Linux or Windows VM, so the device often appears straight away. If the new USB line in the Hardware list shows in a different colour (a pending change), shut the VM down and start it again from Proxmox, or use Proxmox’s own Reboot button. Restarting from inside the guest does not apply pending hardware changes.
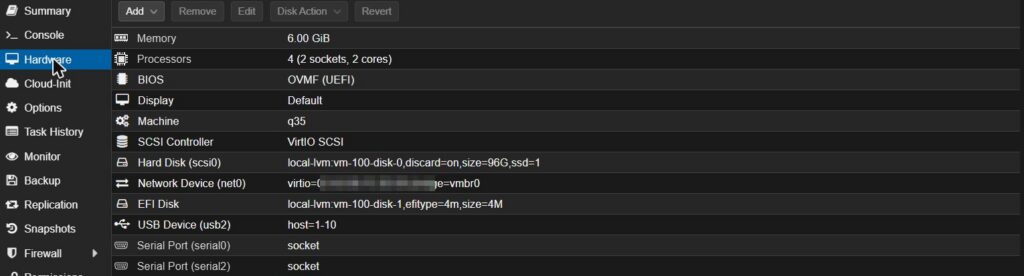
Our Home Assistant VM in the screenshot above uses host=1-10, which is the port form (bus 1, port 10). That port is the host’s internal Bluetooth adapter, which can never be moved, so the port form is fine there. For a dongle that might get plugged into a different socket one day, the ID form is the better default.
Step 4: Check It From Inside the VM
- Home Assistant OS: go to Settings > System > Hardware, open the three-dot menu, choose All hardware and look for your dongle. HA usually also pops up a “discovered” notification for supported Zigbee coordinators.
- Any other Linux VM: run
lsusbandls -l /dev/serial/by-id/inside the VM. You should see the same device you saw on the host.
A note for clusters
A VM with a host USB device attached is tied to that physical machine, so Proxmox won’t live-migrate it to another node as-is. If you run more than one host, look at Datacenter > Resource Mappings: you can map the same kind of device on each node and then pick it with Use mapped Device. Our guide to migrating VMs between Proxmox nodes covers the rest of the migration side.
Part 2: USB Passthrough to an LXC Container
Containers share the host’s kernel, so there is no virtual USB controller. Instead, Proxmox exposes the device file (for example the by-id path from Step 1) inside the container and grants the container permission to use it. The built-in device passthrough feature does all of this for you, and it works with unprivileged containers, so you don’t need to weaken your container’s security to use a USB stick.
Step 2: Add a Device Passthrough Entry
Click your container in the tree, then Resources > Add > Device Passthrough. Fill it in like this:
- Device Path: the full by-id path from Step 1, starting
/dev/serial/by-id/usb-. - Tick Advanced to see the rest.
- UID in CT: leave at
0(root). - GID in CT:
20. That is thedialoutgroup in Debian and Ubuntu containers, the group allowed to use serial ports. Software like Zigbee2MQTT that runs as a normal user needs this. - Access Mode in CT: the default
0660(read and write for owner and group) is right.
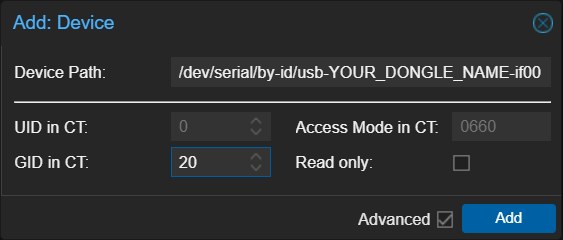
Click Add. The new entry appears in the Resources list as Device (dev0). If you pass through a second device, it becomes dev1, and so on.
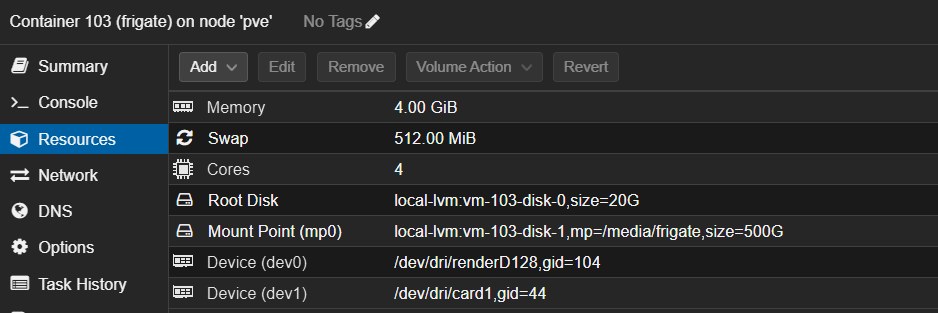
Prefer the command line? This does the same thing (replace 101 with your container ID and use your own path):
pct set 101 -dev0 /dev/serial/by-id/usb-YOUR_DONGLE_NAME-if00,gid=20,mode=0660Either way, Proxmox writes a dev0: line into /etc/pve/lxc/101.conf. You can check it with pct config 101.
Step 3: Restart the Container
Restart the container so it picks up the device. Use the Reboot button in the Proxmox UI or run:
pct reboot 101Step 4: Check It From Inside the Container
pct enter 101
ls -l /dev/serial/by-id/
You should see your dongle at the same path you passed in. Point your software at that full path. For Zigbee2MQTT, that is the serial.port setting, covered in our Zigbee2MQTT setup guide. Type exit to leave the container shell.
The old way, and why you can skip it
Older guides (written before Proxmox 8.1) add lxc.cgroup2.devices.allow and lxc.mount.entry lines to the container config by hand. That still works, but in an unprivileged container it usually leaves the device owned by “nobody”, which means extra ID-mapping work or a privileged container. On any current Proxmox version, the Device Passthrough entry above replaces all of it.
Troubleshooting
The container won’t start after adding the device
A container with a dev entry fails to start if that path doesn’t exist on the host, usually because the dongle is unplugged or the path was copied wrongly. Run ls -l /dev/serial/by-id/ on the host, then fix the entry in Resources (or remove it with pct set 101 --delete dev0) and add it again.
“Permission denied” when the software opens the port
Inside the container, run ls -l on the device path and check the group is dialout. If it isn’t, edit the entry and set GID in CT to 20. If it is, make sure the user your service runs as is in that group: usermod -aG dialout <username>, then restart the service.
The VM can’t see the device
Check the USB line in the Hardware tab isn’t still pending (shut down and start the VM from Proxmox if it is). Check the dongle isn’t also assigned to another running VM or container. And if you used the port method, check the stick is still in the same port.
The by-id folder is empty or missing on the host
/dev/serial/by-id/ only lists USB serial devices. If your device isn’t a serial adapter (a Coral TPU, a UPS, a smart card reader), it won’t be there. In that case, a VM with the vendor/device ID method is the simplest route.
Frequently Asked Questions
Can a VM and a container share the same Zigbee dongle?
No. Only one guest can use the device at a time, and the software using it (ZHA or Zigbee2MQTT) expects sole control of the radio anyway. If several guests need Zigbee, run one Zigbee2MQTT instance and let the others talk to it over MQTT, or use a network-attached coordinator that any guest can reach over your LAN.
Do I need a privileged container for USB passthrough?
No. On Proxmox VE 8.1 and later, the device passthrough entry works with unprivileged containers and sets the owner, group and permissions for you.
Will the passthrough survive a host reboot?
Yes, if you use the vendor/device ID method for a VM or a /dev/serial/by-id/ path for a container. Both follow the device itself, not the order it was detected in. Port-based passthrough also survives reboots, as long as nobody moves the cable. Before you change anything on a working Home Assistant setup, take a backup first. Our guide to backing up and restoring Home Assistant shows how.