
The Homelab Bench is reader-supported. As an Amazon Associate we earn from qualifying purchases; this article contains affiliate links.
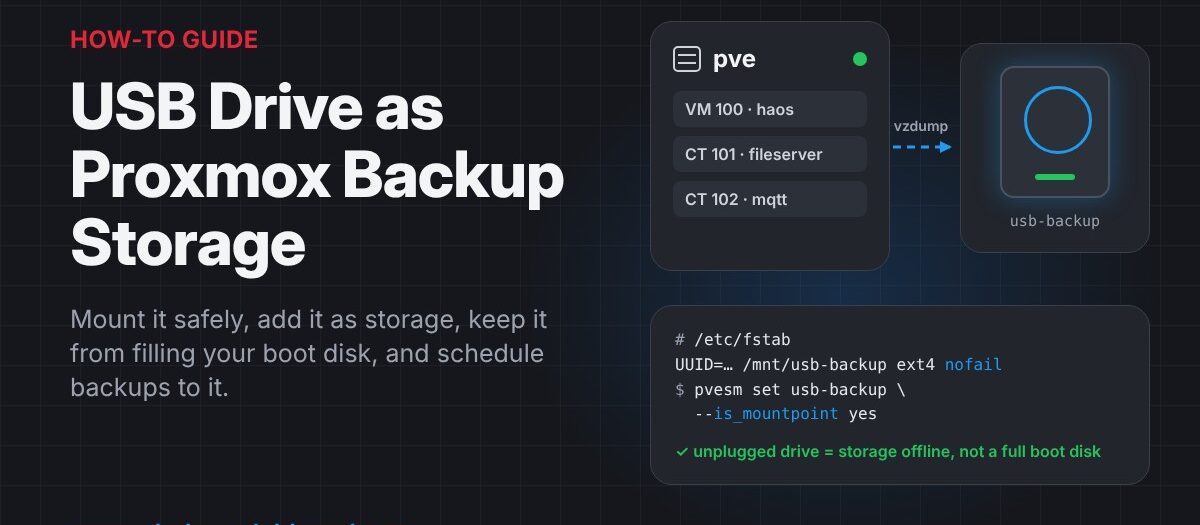
This guide turns a USB hard drive or SSD into a backup target for your Proxmox host. You will mount it so it survives reboots (and doesn’t stop the host booting if it’s unplugged), add it as backup storage, make sure Proxmox can never quietly fill your boot disk instead, and point a scheduled backup job at it.
The screenshots come from a Proxmox VE 9.2 host. The steps are the same on Proxmox VE 8.
What You Need
- A Proxmox VE host with a free USB 3 port
- A USB hard drive or SSD you are happy to wipe (the first method formats it)
- A root shell on the host: click your node, then Shell, or use SSH
A spare 2.5″ or 3.5″ drive in a USB 3 enclosure works just as well as a ready-made external drive:
Check price: Amazon UK | Amazon US | Amazon IE
Or buy a ready-made external drive:
Check price: Amazon UK | Amazon US | Amazon IE
Step 1: Find the Drive
Plug the drive into the Proxmox host. In the web UI, click your node and open Disks. The drive appears with its model, size and current filesystem. Or run this in the shell:
lsblk -o NAME,SIZE,FSTYPE,MODEL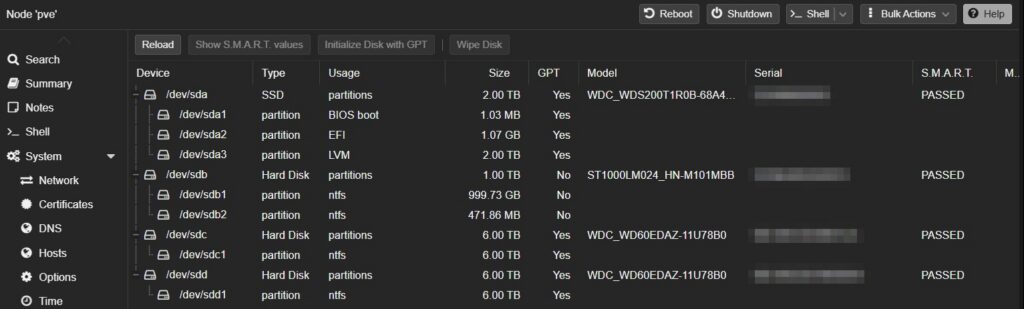
Note the device name, for example /dev/sdc. Device names can change between boots, which is why later steps use the filesystem’s UUID instead. Check the size and model twice before going further. The next step erases the drive.
Step 2: Format It as ext4
Use ext4 for a drive that lives on a Linux host. NTFS works for storing backup files, but on Linux it has no proper file permissions, it’s usually slower, and an unclean unplug can leave it needing a chkdsk on a Windows PC before Linux will mount it read-write again.
Replace /dev/sdX with your drive. This wipes it:
wipefs -a /dev/sdX
parted -s /dev/sdX mklabel gpt mkpart backup ext4 0% 100%
mkfs.ext4 -L usb-backup /dev/sdX1
The first line clears old filesystem signatures, the second creates a single partition covering the whole drive, and the third formats it with the label usb-backup.
The point-and-click alternative
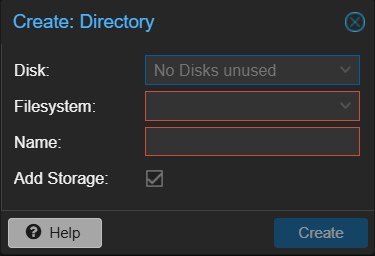
Proxmox can do the formatting, mounting and storage setup in one go under your node > Disks > Directory > Create: Directory. The catch is that it only offers disks with no partitions on them. If the drive has ever been used, the list shows No Disks unused until you select the drive under Disks and click Wipe Disk. That works fine for a drive that stays plugged in. The manual method below gives you more control over what happens when the drive is unplugged, which matters if you plan to rotate drives.
Step 3: Mount It by UUID
Create a folder to mount the drive on and look up its UUID:
mkdir -p /mnt/usb-backup
blkid /dev/sdX1
Copy the value after UUID=. Then open /etc/fstab with nano /etc/fstab and add one line at the bottom, using your UUID:
UUID=your-uuid-here /mnt/usb-backup ext4 defaults,nofail,x-systemd.device-timeout=10s 0 2nofailis the important one. Without it, a missing USB drive at boot drops the host into emergency mode instead of starting your VMs and containers.x-systemd.device-timeout=10sstops boot waiting the default 90 seconds for a drive that isn’t there.0 2: the first number is the olddumpbackup flag (always 0), and the second tells boot to filesystem-check this drive after the root disk.
We mount under /mnt/usb-backup rather than /mnt/pve/, because Proxmox uses /mnt/pve/ for mounts it manages itself (NFS, SMB and GUI-created directories). Keeping yours separate avoids confusion later.
Load the change and mount it:
systemctl daemon-reload
mount -a
df -h /mnt/usb-backup
df should show the drive’s size. If mount -a complains, the UUID in /etc/fstab is almost always the culprit.
Step 4: Add It as Backup Storage
Go to Datacenter > Storage > Add > Directory and fill in:
- ID:
usb-backup(the name you’ll see everywhere in the UI) - Directory:
/mnt/usb-backup - Content: Backup only. Remove the default Disk image, because you don’t want VM disks running from a USB drive.
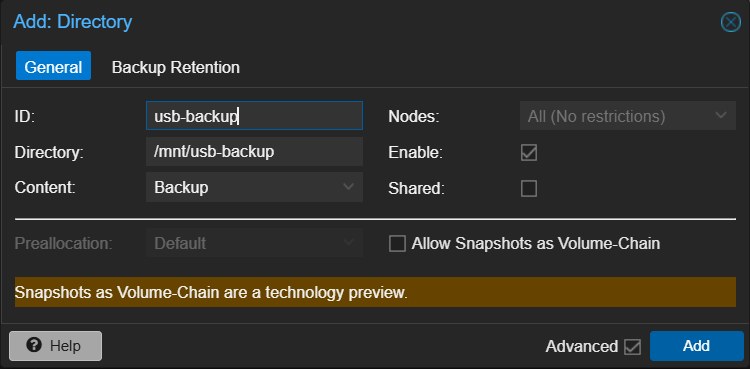
The Backup Retention tab sets how many backups to keep on this drive. Untick Keep all backups and set something like 7 daily, 4 weekly and 3 monthly. Proxmox deletes older backups after each job, so the drive doesn’t fill up.
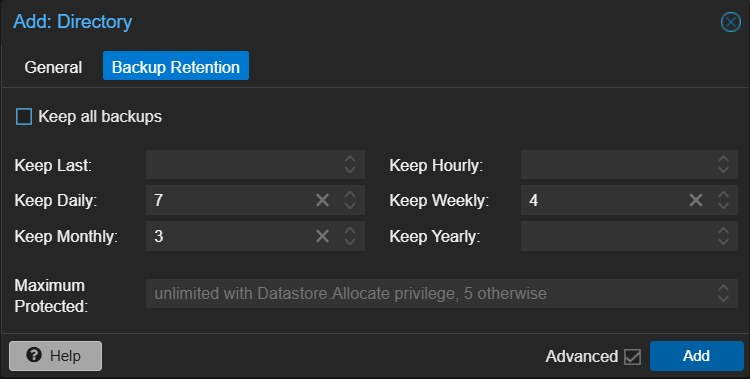
Click Add. The same storage from the shell, retention included, is:
pvesm add dir usb-backup --path /mnt/usb-backup --content backup --prune-backups keep-daily=7,keep-weekly=4,keep-monthly=3Backups are written to a dump folder inside the drive, so the files end up in /mnt/usb-backup/dump/.
Step 5: Stop Backups Filling Your Boot Disk
This step is easy to miss and it matters. If the drive is unplugged or fails to mount, /mnt/usb-backup is just an empty folder on your boot disk. Proxmox would happily write the next backup there and fill the disk your host runs on.
The fix is the is_mountpoint option, which the Add dialog doesn’t show. Set it from the shell:
pvesm set usb-backup --is_mountpoint yesProxmox now treats the storage as offline whenever nothing is mounted at that path, so backup jobs fail loudly instead of writing to the wrong disk. Check it took effect with grep -A5 usb-backup /etc/pve/storage.cfg. You should see an is_mountpoint yes line.
Step 6: Schedule a Backup Job
Go to Datacenter > Backup > Add:
- Storage: pick
usb-backup. - Schedule: a time when nothing much is happening, for example
02:00for every night orsat 02:00for weekly. - Selection mode: All, or Include selected VMs and tick the ones you want.
- Mode: Snapshot keeps guests running during the backup. Stop gives the most consistent copy at the cost of a short outage.
- Compression: ZSTD is fast and compresses well.
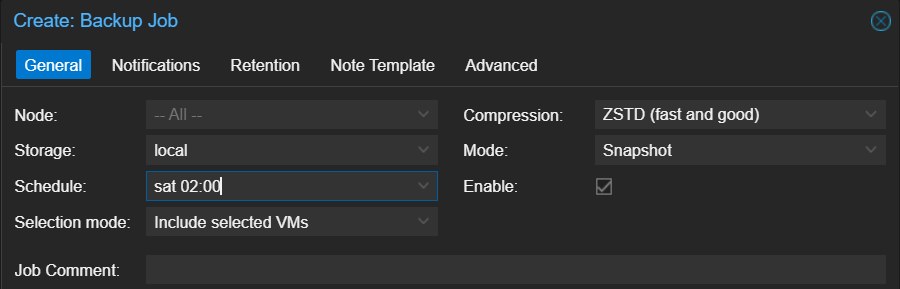
The job’s Retention tab can override the storage’s retention settings. Leave it alone and the storage settings from Step 4 apply.
Click Create, select the job and click Run now to test it straight away. When it finishes, the backups are listed under Datacenter > Storage, or in the tree under usb-backup > Backups.
Unplugging or Rotating the Drive
Never pull the drive while a backup is running. To take it out safely:
pvesm set usb-backup --disable 1
umount /mnt/usb-backup
Disabling the storage stops jobs and the status checker from touching it. When you plug a drive back in, run mount -a and pvesm set usb-backup --disable 0. If you rotate two drives, give both the same fstab line but each with its own UUID, so whichever one is plugged in gets mounted.
Where This Fits in Your Backup Plan
A USB drive sits right next to the host it protects, so a fire, flood or theft takes both. Treat it as your fast, local copy and keep a second one elsewhere: a NAS share (see connecting a NAS to Proxmox) or a Proxmox Backup Server with deduplication (see automated backups with Proxmox Backup Server). If you run PBS, version 3.3 and later can also use a USB drive as a removable datastore, which gives you PBS’s deduplication on a drive you can carry offsite.
Power cuts in the middle of a backup are another risk to a USB drive. If your lab has no battery backup yet, read our guide to picking a UPS for your homelab.
Troubleshooting
The storage shows as unavailable and backups fail
That’s usually is_mountpoint doing its job: nothing is mounted at the path. Check the drive is plugged in, then run mount -a and df -h /mnt/usb-backup.
Backups fail with “Read-only file system”
The kernel remounts a filesystem read-only when it hits errors, often after a bad unplug. Run dmesg | tail -30 to see why. Then unmount the drive, run fsck.ext4 -f /dev/sdX1 and mount it again.
The drive disappears now and then
A USB drive that drops off the bus is usually short of power. Use a powered hub or a drive with its own power supply, avoid front-panel ports, and check dmesg for USB reset messages.
Frequently Asked Questions
Can I keep my existing NTFS drive and its files?
Yes. Mount it with the ntfs3 type in fstab instead of ext4 and skip the formatting. Backups will work, but you lose Linux permissions and NTFS repairs need Windows. For a drive dedicated to backups, ext4 is the better choice.
Will the host still boot if the drive is unplugged?
Yes, as long as the fstab line has nofail. With is_mountpoint set as well, the storage just shows as unavailable and backup jobs to it fail, instead of the host hanging at boot or filling its own disk.
How do I restore from the USB drive?
Click usb-backup in the tree, open Backups, select a backup and click Restore. You can restore over the original guest or to a new ID. If the whole host died, reinstall Proxmox, mount the drive and add the storage as above, and the backups will be there to restore.