
The Homelab Bench is reader-supported. As an Amazon Associate we earn from qualifying purchases; this article contains affiliate links.
Running five or ten self-hosted services on Proxmox is great — until every bookmark is a different IP address and port number you can never remember. A reverse proxy solves that by sitting in front of everything, accepting traffic on ports 80 and 443, and forwarding it to the right service based on the hostname. By the end of this guide you will have a working reverse proxy running in a dedicated Proxmox LXC container — with your choice of Nginx Proxy Manager (a point-and-click web UI) or Caddy (a short text config that handles HTTPS automatically). Both give you clean URLs, free Let’s Encrypt certificates, and no cloud dependency.
Current as of November 2026: Proxmox VE 9.2, Nginx Proxy Manager 2.16, Caddy 2.11, Debian 13 (Trixie) containers.
What a reverse proxy actually does (and why you want one)
Without a reverse proxy, reaching your Home Assistant instance means typing something like http://192.168.1.50:8123. Add Vaultwarden, Grafana, and a media server and you now have four different ports to remember. A reverse proxy lets you use subdomains instead — https://ha.yourdomain.com, https://vault.yourdomain.com — all arriving on the standard HTTPS port 443. The proxy reads the hostname on each request and routes it internally to the right service and port.
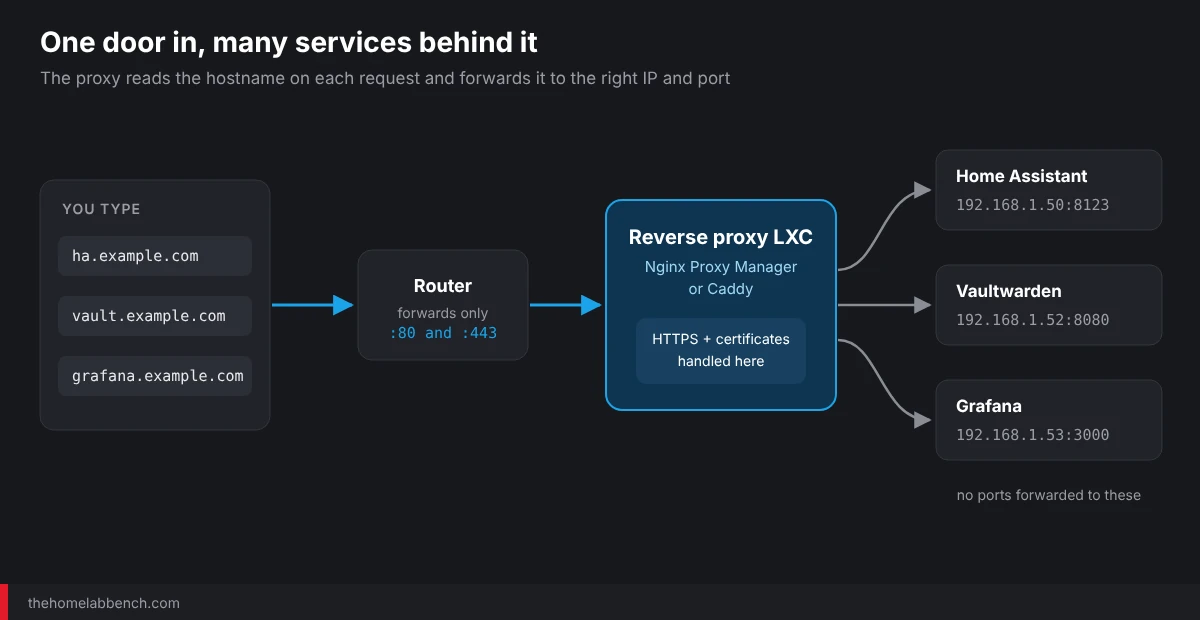
Crucially, only the reverse proxy needs to be reachable from outside your network (or from other VLANs inside it). Every other service stays behind your firewall, with no extra ports forwarded. For a Home Assistant setup that also talks to IoT devices on a separate VLAN — covered in our IoT VLAN for Home Assistant guide — this single-entry-point model is a real security improvement.
Choosing between Nginx Proxy Manager and Caddy
Both tools do the same core job. The choice comes down to how you prefer to work:
- Nginx Proxy Manager (NPM) gives you a full web UI. You click through forms to add proxy hosts, request Let’s Encrypt certificates, and manage access lists. No config files to edit. It is the gentler on-ramp if you would rather stay out of the terminal.
- Caddy is configured through a single text file called the Caddyfile. Give it a public hostname and it obtains and renews a Let’s Encrypt certificate automatically — you write a hostname and a backend address and HTTPS just happens. The trade-off is that you edit a file rather than click a UI, which also makes your whole config easy to back up and copy.
This guide walks through both. Follow whichever part matches your preference; you do not need to do both.
Prerequisites before you start
- A running Proxmox VE host. Screenshots are from Proxmox VE 9.2; the steps are the same on 8.x.
- A domain name you control, with the ability to add DNS records (an A record pointing at your public IP, or a local DNS entry for internal-only setups).
- Access to your router’s admin panel — you will forward ports 80 and 443 to the reverse proxy if you want public certificates using the standard HTTP challenge. (There is a no-open-ports alternative further down.)
- A fixed IP address for the proxy container, set either in Proxmox or via a DHCP reservation in your router.
If you are new to LXC containers in Proxmox, start with creating your first VM and LXC container; the LXC cloning and templating guide is a good follow-on.
A quick tour of the Proxmox UI for first-timers
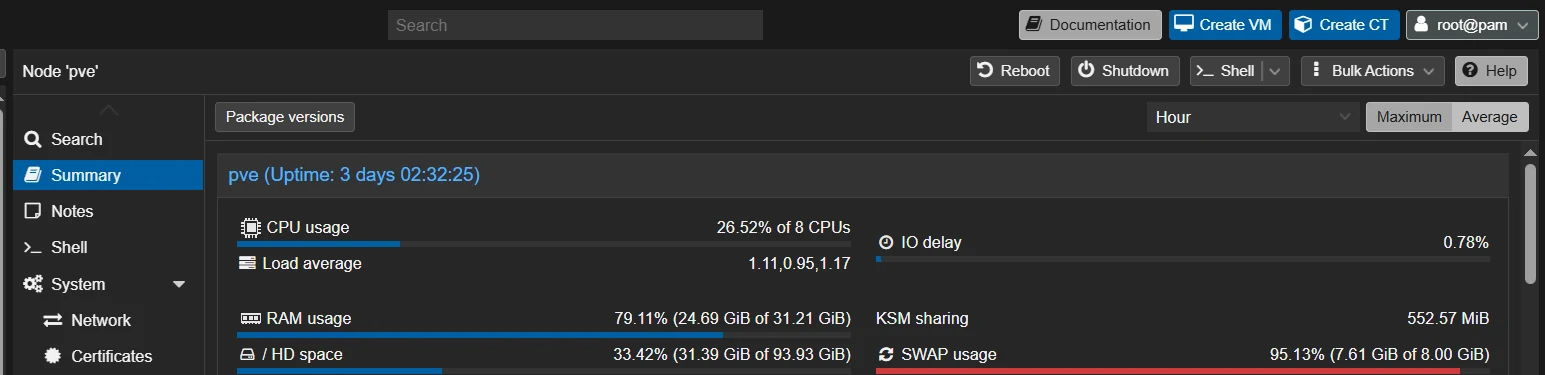
Log in to Proxmox at https://your-proxmox-ip:8006. The resource tree on the left lists your node (usually pve) with its VMs and containers underneath. Click the node name and its toolbar appears at the top right of the main panel: the Shell button there opens a root terminal directly on the Proxmox host, which is where you run the community install scripts in this guide. The Create CT button in the very top bar starts the wizard for a new LXC container. You can also SSH into the host instead of using Shell; both reach the same place.
Part 1 — Nginx Proxy Manager on Proxmox
Step 1: Create the NPM LXC using the community script
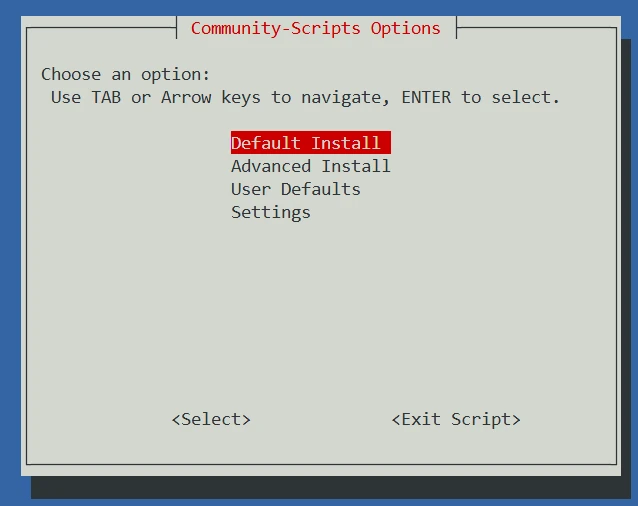
The Proxmox VE Community Scripts project maintains a one-line installer that creates an unprivileged Debian 13 LXC and installs Nginx Proxy Manager inside it (natively, not in Docker). Open a shell on your Proxmox host (click your node → Shell) and run:
bash -c "$(curl -fsSL https://raw.githubusercontent.com/community-scripts/ProxmoxVE/main/ct/nginxproxymanager.sh)"The script opens with a menu. Default Install gives you a container with 2 CPU cores, 2 GB RAM and an 8 GB disk; Advanced Install walks you through each setting, including the container ID, resources and network, if you want to set a static IP up front.
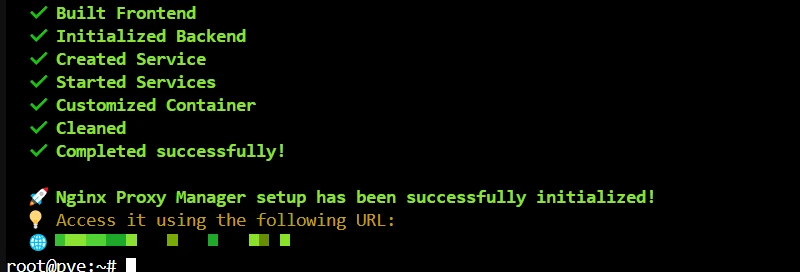
The install builds OpenResty and the NPM web interface from source, so expect it to take around ten minutes on a small host. When it finishes, the script prints the admin URL — http://<container-ip>:81. Note that IP down.
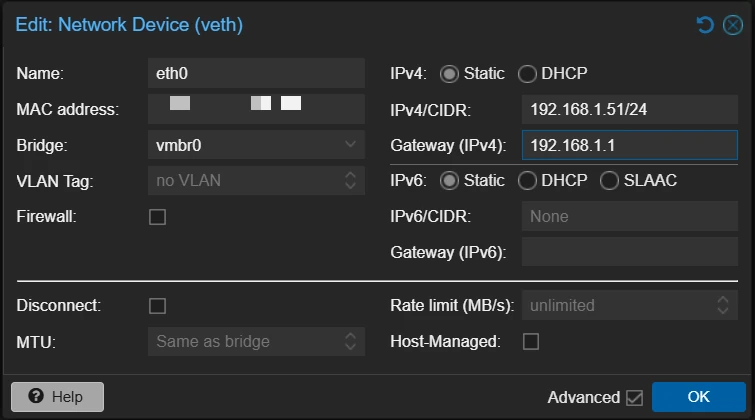
The default install uses DHCP. The proxy needs an address that never changes, because your router will forward traffic to it. Either set a DHCP reservation in your router for the container’s MAC address, or switch it to a static address in Proxmox: select the container → Network → double-click net0, choose Static and enter the address in CIDR notation plus your router as the gateway.
Step 2: Forward ports on your router
In your router’s port-forwarding section, create two rules pointing at the proxy container’s IP:
- External port 80 → container IP, port 80
- External port 443 → container IP, port 443
Port 80 is used by the Let’s Encrypt HTTP-01 challenge that proves you control the domain. Port 443 carries your actual HTTPS traffic. Never forward port 81 — that is the admin interface.
Step 3: Create your admin account
Open http://<your-npm-container-ip>:81 in a browser. Current versions of NPM (2.13 and later) no longer ship with a default login — the old [email protected] / changeme pair you will see in older guides is gone. Instead, a first-run setup wizard asks you to create the admin user.
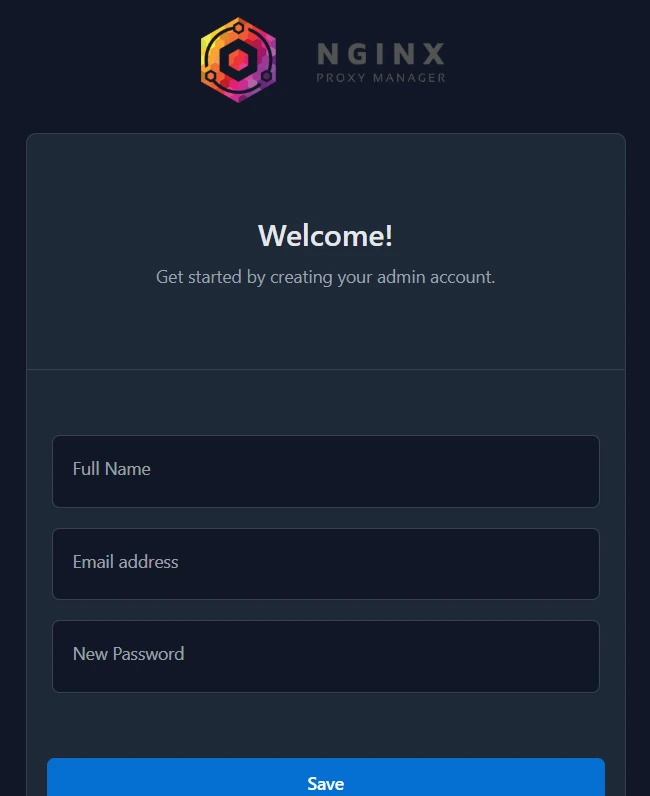
Use a real email address here. NPM now uses your account’s email as the Let’s Encrypt contact address for every certificate you request, rather than asking for it per certificate. Do this straight after the install finishes: until the account exists, anyone on your network who reaches port 81 first could create it.
Step 4: Understanding the NPM dashboard
Once logged in, the menu along the top is where everything lives:

- Hosts → Proxy Hosts — where you define each service you want to expose. Each entry maps an incoming hostname to a backend IP and port. The same menu holds Redirection Hosts, Streams (TCP/UDP forwarding, not needed for web services) and 404 Hosts.
- Certificates — where your Let’s Encrypt certificates are listed. NPM renews them automatically.
- Access Lists — optional IP allowlisting or HTTP basic auth you can attach to any proxy host.
- Logs and Audit Logs — handy when a host misbehaves or you want to see what changed.
Step 5: Add your first proxy host
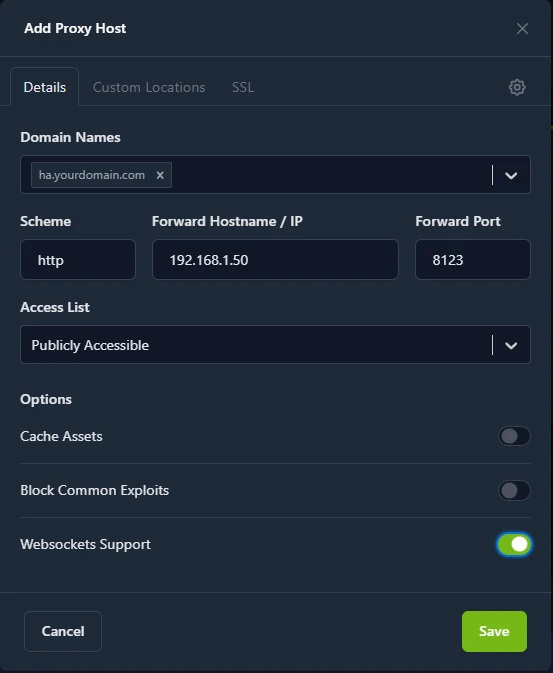
- Go to Hosts → Proxy Hosts and click Add Proxy Host.
- In Domain Names, type the subdomain you want to use — for example
ha.yourdomain.com— and press Enter to add it. - Set Scheme to
http(unless the backend itself only speaks HTTPS). - In Forward Hostname / IP, enter the internal IP of the service — for example your Home Assistant VM.
- In Forward Port, enter the port it listens on —
8123for Home Assistant. - Turn on Websockets Support. Home Assistant and many other dashboards use WebSockets for live updates and misbehave without it.
- Click Save.
Step 6: Request a Let’s Encrypt certificate
Before requesting a certificate, make sure the subdomain’s DNS record points at your public IP — Let’s Encrypt has to reach your proxy through it. Then:
- Open the proxy host for editing (or do this while creating it) and switch to the SSL tab.
- From the SSL Certificate dropdown, choose Request a new Certificate.
- Turn on Force SSL so plain HTTP visits are redirected to HTTPS. HTTP/2 Support is safe to enable too.
- Click Save. NPM contacts Let’s Encrypt, completes the HTTP-01 challenge on port 80 and stores the certificate. This usually takes well under a minute.
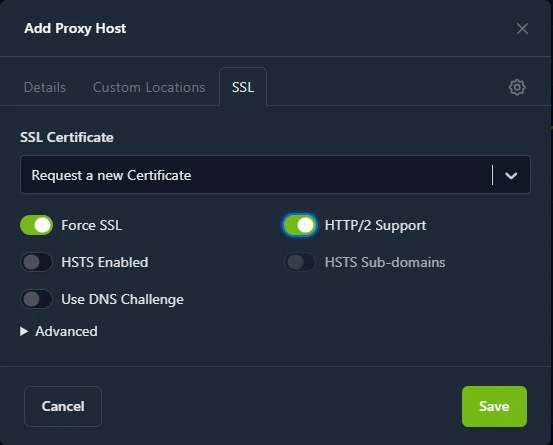
When it succeeds, the host shows as online with a certificate attached, and https://ha.yourdomain.com loads with a valid padlock. NPM renews the certificate automatically before it expires.
Step 7: Tell Home Assistant to trust the proxy
Home Assistant rejects requests forwarded by a proxy it does not know about — you will see a 400: Bad Request page until you fix this. Edit configuration.yaml in your Home Assistant config directory and add (or extend) the http: section:
http:
  use_x_forwarded_for: true
  trusted_proxies:
    - 192.168.1.51  # replace with your proxy container's IP
Save, then restart Home Assistant from Settings → ⋮ (top right) → Restart Home Assistant. Test the HTTPS URL again. If you still get a 400, the IP in trusted_proxies does not match the address the proxy connects from — check the container’s IP in Proxmox. If you run Home Assistant OS in a Proxmox VM, our Home Assistant Proxmox VM guide covers where the config lives, and the backup and restore guide shows how to take a backup before editing it.
Part 2 — Caddy on Proxmox
Caddy’s headline feature is automatic HTTPS: any site block with a public hostname gets a Let’s Encrypt certificate, renewals and an HTTP-to-HTTPS redirect with no extra configuration. For a homelab with a lot of services, that removes a lot of repetitive clicking.
Step 1: Create the Caddy LXC
You have two options.
Quick route — community script. The same Community Scripts project has a Caddy installer. From the Proxmox host shell:
bash -c "$(curl -fsSL https://raw.githubusercontent.com/community-scripts/ProxmoxVE/main/ct/caddy.sh)"It asks whether you want a Debian 13 or Alpine container, then creates it (Debian defaults: 1 core, 512 MB RAM, 6 GB disk) with Caddy already installed. If you use this, skip to Step 3.
Manual route — build the container yourself. Worth doing once so you know what the scripts are doing for you. First make sure you have a Debian 13 template: select your local storage → CT Templates → Templates, pick debian-13-standard and click Download.
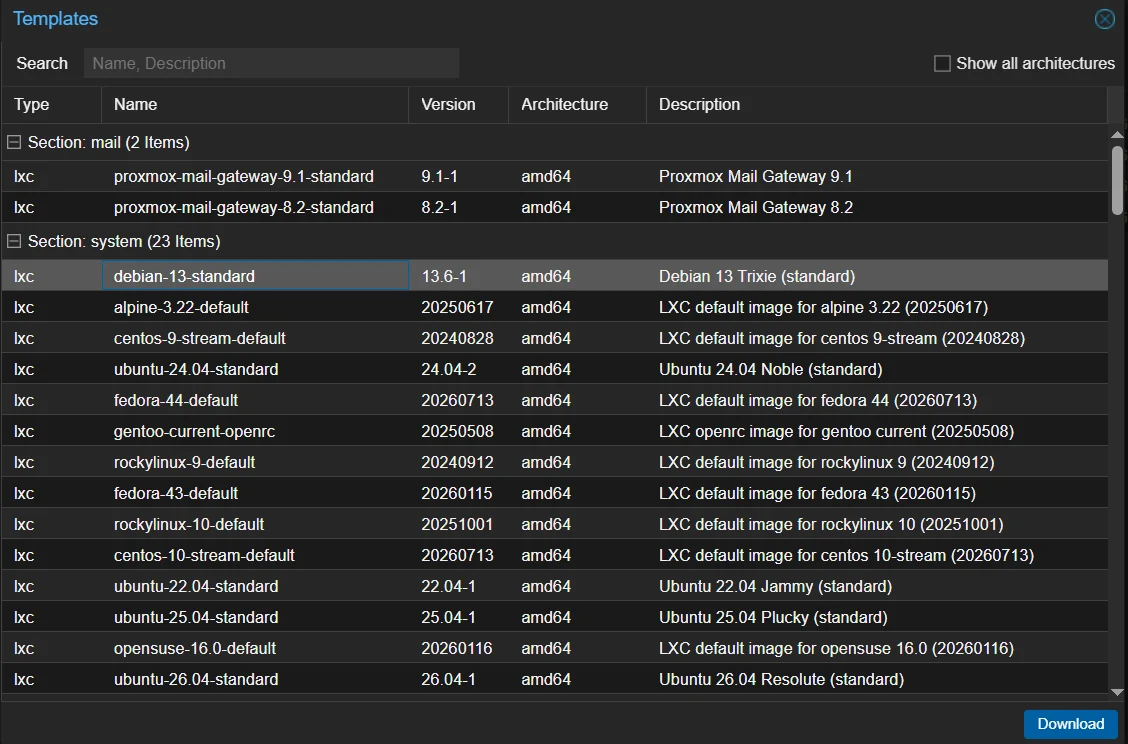
Then click Create CT in the top bar and work through the wizard:
- General: a hostname such as
caddy, a root password, and leave Unprivileged container ticked. - Template: the
debian-13-standardtemplate you just downloaded. - Disks: 4 GB is plenty.
- CPU: 1 core. Memory: 512 MB RAM, 512 MB swap.
- Network: choose Static and enter an address in CIDR notation, for example
192.168.1.51/24, with your router’s IP as the gateway. - Confirm: tick Start after created and click Finish.
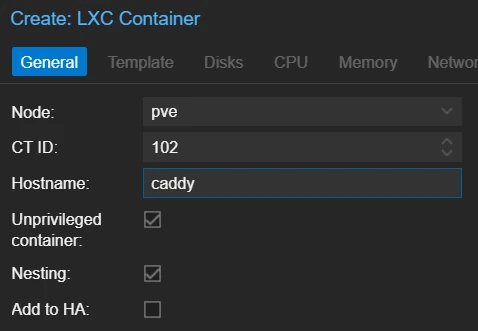
Once it is running, select the container and open Console (or SSH in) to get a shell inside it.
Step 2: Install Caddy from the official repository
Caddy publishes official Debian packages. Inside the container, run the following. The minimal Debian template does not include gpg, so it is added to the first line:
apt update && apt install -y debian-keyring debian-archive-keyring apt-transport-https curl gnupg
curl -1sLf 'https://dl.cloudsmith.io/public/caddy/stable/gpg.key' | gpg --dearmor -o /usr/share/keyrings/caddy-stable-archive-keyring.gpg
curl -1sLf 'https://dl.cloudsmith.io/public/caddy/stable/debian.deb.txt' | tee /etc/apt/sources.list.d/caddy-stable.list
chmod o+r /usr/share/keyrings/caddy-stable-archive-keyring.gpg
chmod o+r /etc/apt/sources.list.d/caddy-stable.list
apt update && apt install -y caddy
The package installs Caddy as a systemd service and starts it straight away. Check it:
systemctl status caddyYou should see active (running). It starts automatically whenever the container boots.
Step 3: Forward ports on your router
Exactly as in the NPM section — forward external ports 80 and 443 to the Caddy container’s IP. Only one machine can receive a given external port, so if you built both an NPM and a Caddy container, forward to one of them only.
Step 4: Write your Caddyfile
Caddy’s configuration lives at /etc/caddy/Caddyfile:
nano /etc/caddy/CaddyfileReplace the placeholder content with one block per service:
ha.yourdomain.com {
    reverse_proxy 192.168.1.50:8123
}

vault.yourdomain.com {
    reverse_proxy 192.168.1.52:8080
}
That is the whole configuration. For each hostname that has a public DNS record pointing at your IP, Caddy obtains a Let’s Encrypt certificate, renews it, and redirects HTTP to HTTPS. WebSockets are proxied automatically, so Home Assistant works without any extra lines, and Caddy sets the X-Forwarded-For header that Home Assistant needs.
For a LAN-only name that Let’s Encrypt cannot validate, tell Caddy to use its own built-in certificate authority instead:
ha.home.arpa {
    tls internal
    reverse_proxy 192.168.1.50:8123
}
tls internal issues a certificate signed by Caddy’s local root CA. Browsers will warn about it until you install that root certificate on your devices, and you will need a local DNS record (in AdGuard Home, Pi-hole or your router) pointing the name at the Caddy container. home.arpa is the domain reserved for exactly this kind of home-network use.
Step 5: Validate and reload
Check the file for mistakes, then reload without dropping connections:
caddy validate --config /etc/caddy/Caddyfile
systemctl reload caddy
Follow the log to watch certificates being issued:
journalctl -u caddy -fFor a public hostname you will see Caddy obtain the certificate within a few seconds. Certificates are stored under Caddy’s data directory (/var/lib/caddy/.local/share/caddy for the Debian package), so include the container in your backups.
Step 6: Tell Home Assistant to trust Caddy
Same as the NPM step — add the http: section to configuration.yaml with the Caddy container’s IP in trusted_proxies:
http:
  use_x_forwarded_for: true
  trusted_proxies:
    - 192.168.1.51  # replace with your Caddy container's IP
Restart Home Assistant and test your HTTPS URL.
Step 7: Adding more services
To proxy another service, add a new block to /etc/caddy/Caddyfile, run caddy validate, then systemctl reload caddy. The reload is graceful and Caddy requests the new certificate in the background. One thing to know: a reload closes open WebSocket connections, so Home Assistant dashboards will briefly show a reconnecting message.
Shared next steps for both setups
No port forwarding? Use the DNS challenge
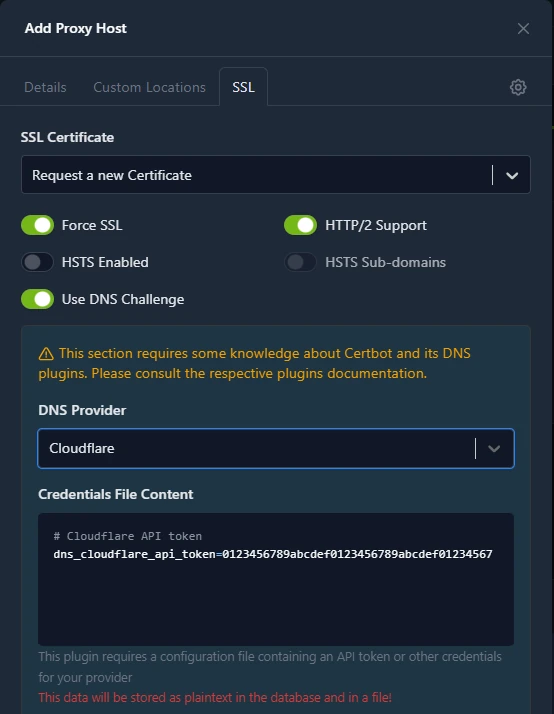
If you cannot or would rather not open ports 80 and 443 — for example behind CGNAT, or for services you only use at home — you can still get real Let’s Encrypt certificates with the DNS-01 challenge. The proxy proves ownership by creating a temporary DNS record through your DNS provider’s API, so nothing needs to be reachable from the internet. In NPM, turn on Use DNS Challenge on the SSL tab, pick your provider and paste its API token into the credentials box. NPM stores that token in plain text, so for Cloudflare create a token limited to Zone → DNS → Edit on just the one domain. Caddy needs a build that includes your provider’s DNS module, available from Caddy’s download page or built with xcaddy. Pair this with a local DNS record pointing the hostname at the proxy and you get trusted HTTPS on the LAN with no open ports.
Make sure the proxy starts at boot
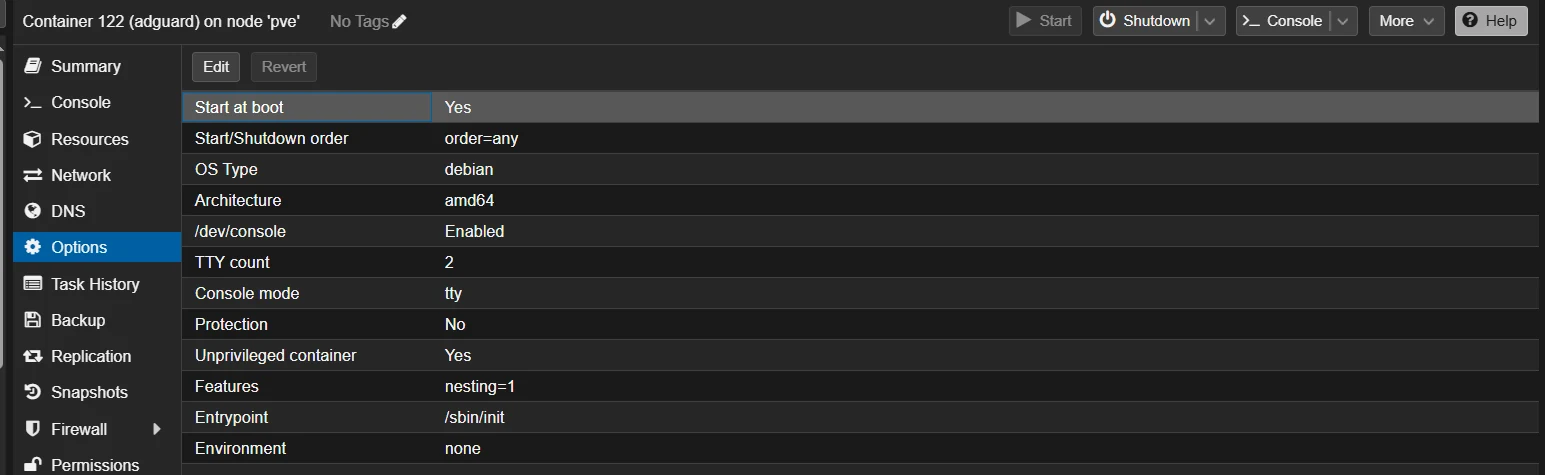
Your reverse proxy is now the front door for everything, so it needs to come back on its own after a host reboot. Containers you create through the Create CT wizard do not start at boot unless you turn it on. Select the container → Options → double-click Start at boot and tick it. Check this on whichever container you used, whether it came from a script or the wizard.
Keeping the container updated
For either community-script container, run update from the container’s console — the scripts install that command, and it pulls the latest release of NPM or Caddy. For a manually built Caddy container, apt update && apt upgrade handles it. Include the proxy container in your scheduled backups; if you have not set those up yet, the Proxmox Backup Server guide or our guide to backing up to an external USB drive is the natural next step.
Lock down the NPM admin port
Port 81 (the NPM admin UI) should never be reachable from outside your network — make sure it is not in your router’s port-forward list. You can go further by enabling the Proxmox firewall on the container and allowing port 81 only from your trusted LAN or management VLAN. Turning on two-factor authentication for your NPM account (in your user profile) is also worth the minute it takes.
Protect the host with a UPS
With every service behind one container, a power blip on the Proxmox host takes everything offline until it boots again. A UPS gives the host a clean shutdown window and protects your storage from sudden power loss. Our best UPS for your homelab guide walks through what to look for.
Check price: Amazon UK | Amazon US | Amazon IE
Troubleshooting quick-reference
| Symptom | Most likely cause | Fix |
|---|---|---|
| Certificate request fails or times out | Port 80 not forwarded to the proxy, or the DNS record does not point at your public IP | Check the router rules and the container IP; check the A record. Or switch to the DNS challenge. |
| Home Assistant returns 400: Bad Request | Missing or wrong trusted_proxies in configuration.yaml |
Set use_x_forwarded_for: true and add the proxy container’s exact IP, then restart HA |
| HA dashboard loads but never updates | WebSockets not passed through | NPM: turn on Websockets Support for the host. Caddy handles WebSockets automatically — check the backend address and port instead. |
| Port 81 shows a blank page or will not load after install | NPM services still starting, or a service failed | Wait a minute and refresh; inside the container run systemctl status npm openresty and journalctl -u npm -e |
| Login page asks for [email protected], which does not work | Following an older guide | NPM 2.13+ has no default account — complete the setup wizard instead |
| Browser warning on a LAN-only Caddy hostname | Using tls internal without trusting Caddy’s root CA |
Install Caddy’s root certificate on your devices, or use the DNS challenge for a publicly trusted certificate |
FAQ
Do I need a domain name, or can I use the reverse proxy locally?
You can use it locally. Point hostnames at the proxy with a local DNS resolver such as AdGuard Home or Pi-hole. For HTTPS without browser warnings, the cleanest route is a cheap real domain plus the DNS challenge described above — you get publicly trusted certificates even for names that only resolve on your LAN. Without a domain, Caddy’s tls internal gives you HTTPS from its own CA, but every device then needs to trust that CA’s root certificate.
Can I run NPM and Caddy at the same time on the same Proxmox host?
Yes. Each lives in its own container with its own IP, so both can listen on ports 80 and 443 without conflict. What you cannot do is forward the same external ports from your router to both. Pick one for external traffic; the other can still serve internal hostnames if your local DNS points at it.
What happens to my reverse proxy if Proxmox reboots?
If Start at boot is enabled on the container, it comes back up with the host and NPM or Caddy starts automatically inside it, usually within a minute of the host finishing its boot. If it does not come back, check that setting first — it is off by default for containers created through the wizard. Your backend services do not need to start before the proxy; requests simply fail with a 502 until each backend is up.