
The Homelab Bench is reader-supported. As an Amazon Associate we earn from qualifying purchases; this article contains affiliate links.
This guide walks you through backing up and restoring Home Assistant, from your first manual backup to an automated, multi-location setup that survives dead hardware. By the end you will know how to create backups, get copies off your Home Assistant machine, store your encryption key safely, and restore your setup whether Home Assistant is still running or has stopped booting entirely. Menu names and screens are current as of Home Assistant 2026.9.
Why Backups Matter More Than You Think
A Home Assistant backup is a single archive (a .tar file) that captures your configuration, automations, dashboards, apps and integration data. If a drive dies, an update goes sideways, or you migrate to new hardware, that file is what lets you rebuild everything. The trap most people fall into is not that backups are hard to create. It is that backups stored only on the Home Assistant machine are lost the moment the machine is lost. If your SSD dies, the backup on that SSD dies with it. You need at least one copy somewhere else.
The widely cited 3-2-1 rule gives you a practical target: three copies of your data, on two different types of storage, with one copy off-site. Home Assistant’s built-in backup tools make that achievable in a few minutes, with no command line required.
If you are thinking about moving Home Assistant onto something more capable than a Raspberry Pi, see our Best Mini PCs for Proxmox Homelabs guide. Running Home Assistant in a Proxmox VM is one of the cleanest setups there is, and it adds a second layer of backups on top of everything below (see Step 7).
A Quick Orientation: Apps and the Backups Screen
Apps (formerly called add-ons). Since Home Assistant 2026.2, add-ons are called apps and the Add-on Store is the App Store. Nothing works differently, but older guides and forum posts still use the old names.
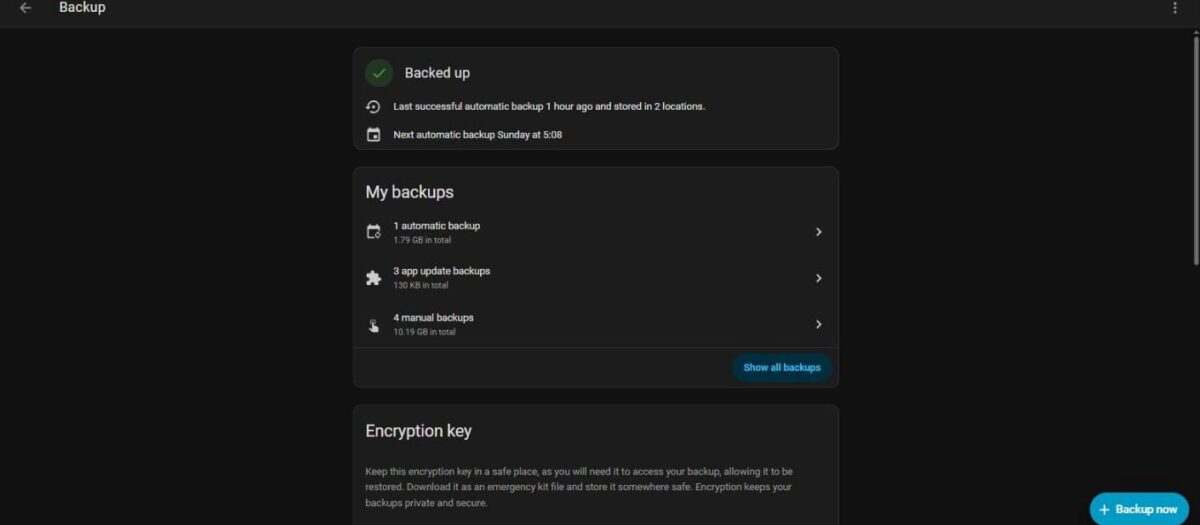
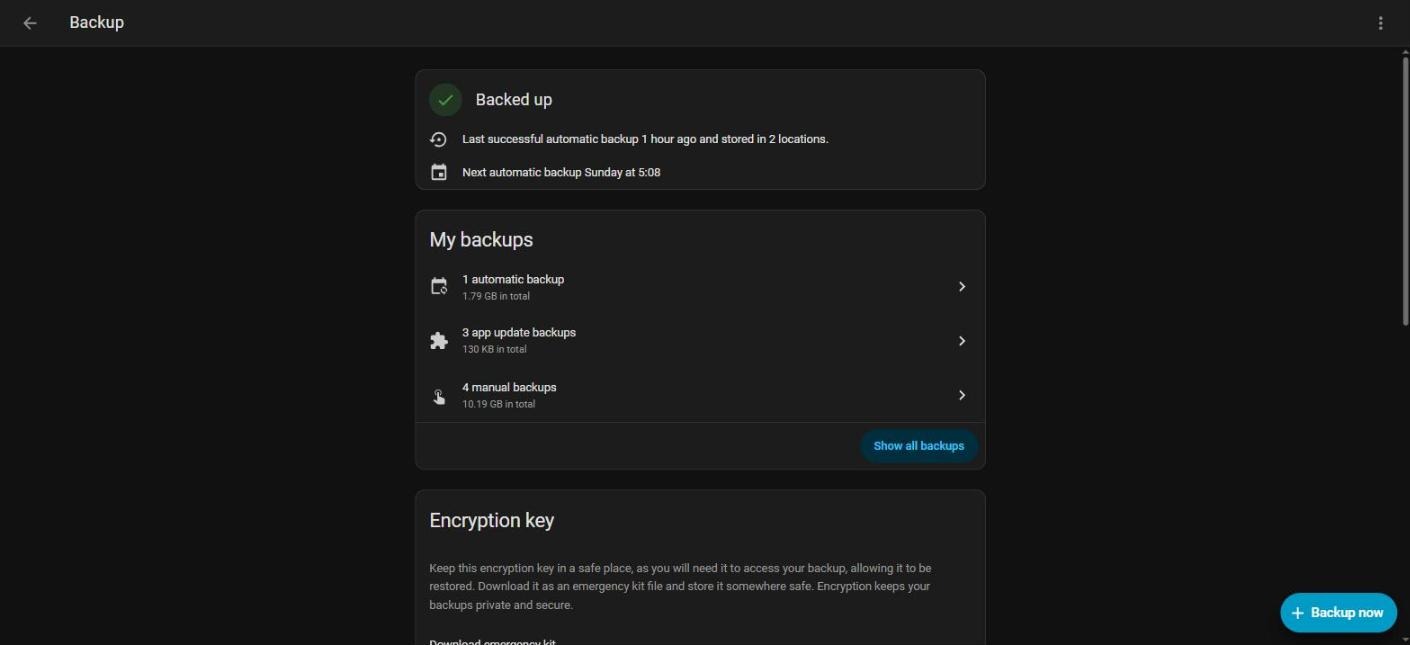
Everything in this guide lives under Settings → System → Backups. Here is what you will find there:
- Set up backups: on a system that has never been configured, a wizard walks you through automatic backups and gives you your encryption key. Do not skip it.
- Encryption key: where you download your emergency kit (Step 4).
- Automatic backup → Configure backup settings: schedule, retention, what to include and locations.
- Backup now (lower-right corner): starts a manual backup.
- Show all backups: opens the My backups list, showing each backup’s size, date, type and which locations hold a copy. Its three-dot menu (top right) has Upload backup, and selecting a backup opens its detail page, where you choose what to restore.
Step 1: Understand What a Backup Contains
A full backup includes your config folder (configuration, automations, dashboards, the history database and most integration data), plus the share, ssl and media folders, and your installed apps with their data. Apps you installed from the App Store are backed up as app data and reinstalled on restore; the addons folder itself only holds apps you created or installed manually.
That coverage includes your Zigbee network. ZHA keeps its database in the config folder, and Zigbee2MQTT keeps its data (including the network key and coordinator backup) in /homeassistant/zigbee2mqtt. Both end up in a full backup.
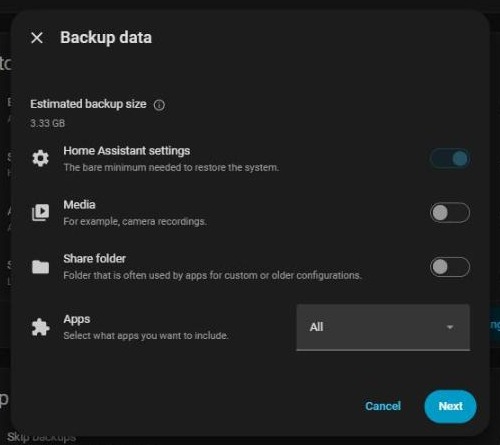
Backups can get large. The two biggest contributors are usually the history database and the media and share folders. Home Assistant’s own recommendation is to turn off media and the share folder in your backups unless you actually keep something important there. Smaller backups are faster to create, faster to upload and faster to restore.
Step 2: Create Your First Manual Backup
- Go to Settings → System → Backups.
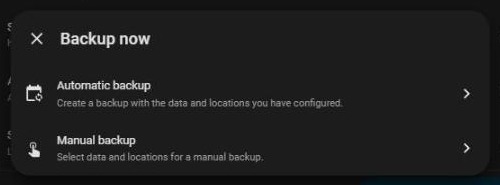
- In the lower-right corner, select Backup now, then Manual backup.
- Choose the data to include. For a first backup, include everything except media and the share folder (unless you store things there you care about).
- Give the backup a descriptive name, such as
before-2026.10-updateorworking-config-oct-2026. That is far more useful than a timestamp when you are scanning a list under pressure. - Choose the backup locations. For now, the local one is fine.
- If prompted, download the backup emergency kit and keep it with the backup name it belongs to (more on this in Step 4).
- Select Create backup. Depending on the size of your installation, it takes anything from a few seconds to a few minutes.
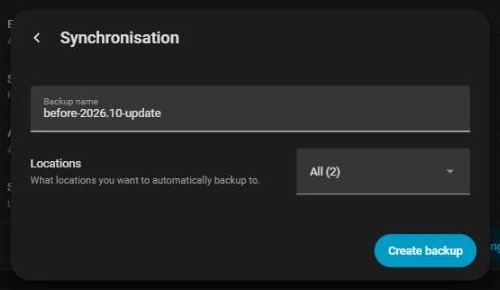
That backup now lives on your Home Assistant device, and only there for now. Make a manual backup before any risky change: Core or OS updates, coordinator migrations, or big automation edits. Name it after the reason so you can find it later.
Step 3: Download a Copy to Your Computer
This is the fastest way to get a copy off the machine, and it’s worth doing now before you set up anything automatic.
- Under Settings → System → Backups, select Show all backups.
- Open the three-dot menu on the backup’s row and choose Download. Your browser saves a
.tarfile. - Move that file somewhere deliberate: a NAS folder, a USB drive kept somewhere safe, or cloud storage you control. A file in your Downloads folder will eventually be forgotten or deleted.
Important: backups downloaded from the Backups page are decrypted on the fly, so the file on your computer is not encrypted. You can open it in any archive tool, which is handy in an emergency, but it means that file contains everything in your Home Assistant, including stored credentials and API tokens. Treat it like a password file: keep it on storage you trust, and don’t upload it anywhere public.
Manual downloads are a useful habit, but as your only off-device copy they are error-prone. Steps 5 and 6 automate it.
Step 4: Save Your Encryption Key (Do This Now)
Home Assistant generates a unique encryption key for your backups. You need it to restore any encrypted backup, including on the same machine. If you lose it and your only copies are encrypted, there is no reset path.
- Go to Settings → System → Backups. If you haven’t set up backups yet, select Set up backups; the wizard offers the emergency kit as its first step.
- If backups are already configured, the Encryption key section is further down the main Backups page: select Download next to Download emergency kit.
- Store the kit outside Home Assistant: a password manager is ideal, or a USB drive kept with important documents. A copy on the same machine as your backups defeats the purpose.
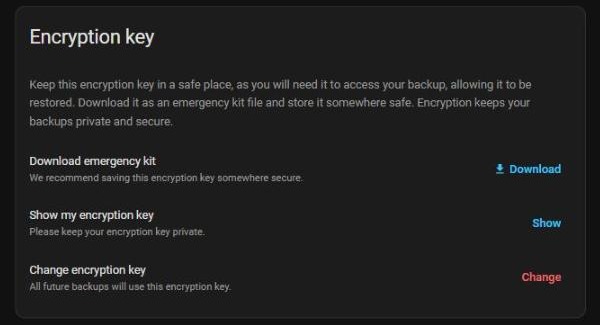
If you ever use Change encryption key, older backups still need the old key. Keep both emergency kits until you no longer need backups made with the old one.
As of Home Assistant 2026.4, encrypted backups use SecureTar v3, which uses Argon2id for key derivation (making brute-force attacks much more expensive) and XChaCha20-Poly1305 for authenticated encryption (so backups are both encrypted and tamper-evident). Any encrypted backup created after updating to 2026.4 uses the new format automatically. Keep Home Assistant up to date and there is nothing else to do.
Step 5: Set Up Automatic Backups
Manual backups are a safety net for specific changes. They’re no substitute for a schedule that runs whether or not you remember.
- Go to Settings → System → Backups and, under Automatic backup, select Configure backup settings (or Set up backups on a fresh system).
- Set the schedule to Daily, which is Home Assistant’s recommendation.
- For the time, System optimal picks a window automatically. If a NAS or other destination might be asleep overnight, switch to Custom and pick a time when every location is awake. A backup fails for any location that isn’t available when it runs.
- Under Backup preference when updating, choose to back up before updates rather than Skip backups. This is a default you can still override each time you update, and on a large install it means updates start a little later while the backup runs.
- Under Retention, choose how many backups to keep, or for how many days. Older ones are deleted automatically. Keeping seven daily backups gives you a week to notice a mistake; if you tend to find problems late, keep 14.
- Choose what to back up. As in Step 1, leave media and the share folder off unless you need them.
- Enable your backup locations (Step 6). Changes on this page save as you make them.
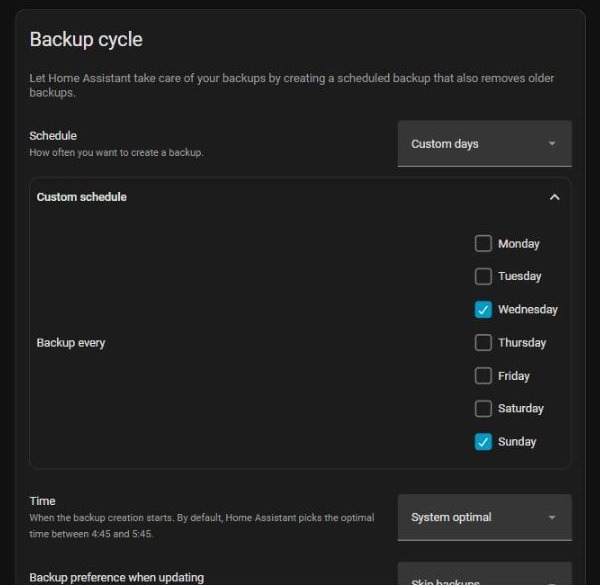
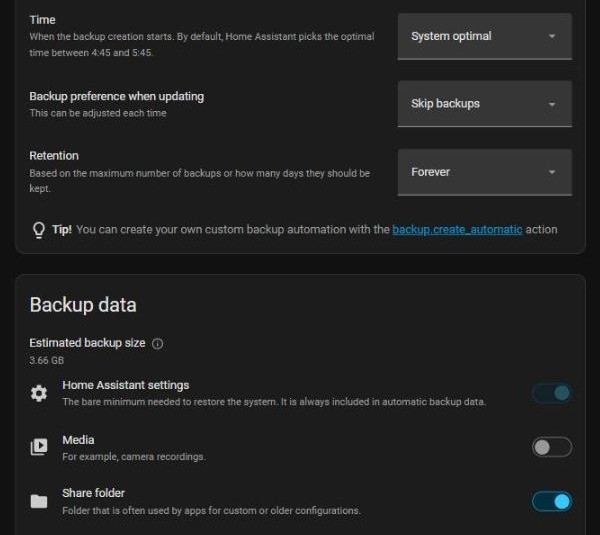
If the built-in schedule doesn’t fit, the backup.create_automatic action lets you trigger an automatic backup from your own automation. For example, you can wake a NAS with Wake-on-LAN, wait until it responds, and only then start the backup.
Step 6: Add a Second Backup Location (Off the Device)
This is the step most people skip, and it matters most. Enable at least one location that isn’t your Home Assistant machine. Each location you enable has a cog where you can turn encryption on or off for that location. Keep encryption on for anything in the cloud.
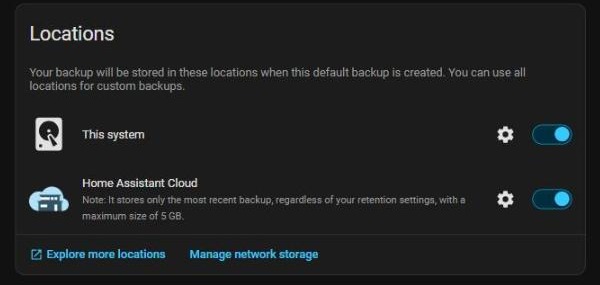
Option A: Network storage (NAS or shared folder)
If you have a NAS, or a Windows PC with a shared folder, Home Assistant OS can write backups straight to it over SMB or NFS. Network storage is a Home Assistant OS feature, so it isn’t available on Container installs.
- Go to Settings → System → Storage and select Add network storage.
- Enter the server address and share name, plus the username and password for SMB (or the path for NFS).
- Set the usage to Backup and save.
- Go back to Configure backup settings and switch on the new location. The Manage network storage link under the locations list takes you to the same Storage page.
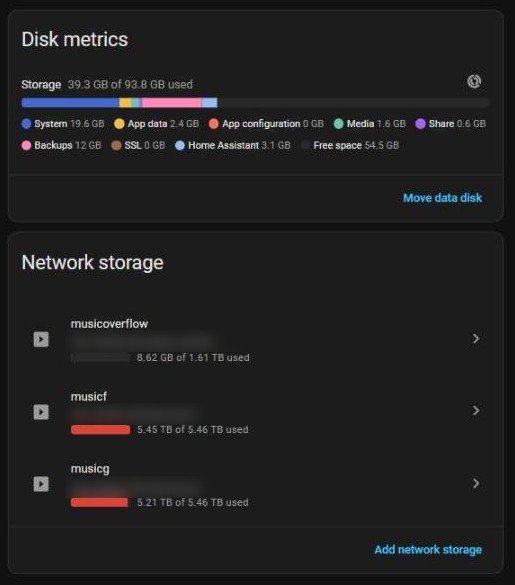
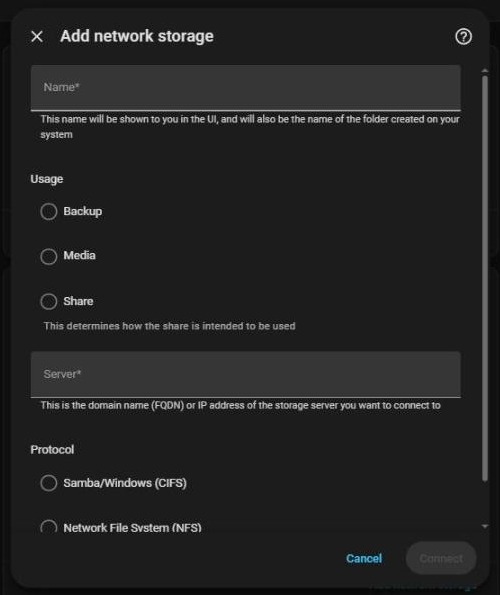
Synology owners have a second option: since 2025.2, the Synology DSM integration can act as a backup location directly, with no separate share to set up. If you are sharing a Windows drive for other homelab uses too, our guide to setting up a Windows drive for sharing covers the share side.
A two-bay Synology DiskStation is the classic home backup target: it works with both the network storage method and the Synology DSM integration.
Check price: Amazon UK | Amazon US | Amazon IE
Option B: Google Drive or Microsoft OneDrive
Since Home Assistant 2025.2, Google Drive and Microsoft OneDrive are built-in backup locations, with no third-party app required. Add either under Settings → Devices & services → Add integration, search for the service, complete the sign-in, then switch it on under Configure backup settings. The free tiers (15 GB for Google Drive, shared with Gmail, and 5 GB for OneDrive) comfortably hold several typical backups if you leave media out.
Option C: Home Assistant Cloud (Nabu Casa)
If you subscribe to Home Assistant Cloud, backup storage is included at no extra cost, with one important limit: it stores one backup, the most recent one sent there, up to 5 GB. Those backups are always encrypted, and you can restore from Home Assistant Cloud directly during onboarding on a new device. It’s a great disaster-recovery copy, but it won’t give you any history to roll back through, so pair it with another location.
Option D: Cloudflare R2 (free tier, off-site)
Since Home Assistant 2026.2, Cloudflare R2 is an official backup integration. R2 has a generous free tier and no egress fees, so downloading a large backup in an emergency costs nothing. Create a bucket and an API token scoped to that bucket in the Cloudflare dashboard, then add Cloudflare R2 under Settings → Devices & services → Add integration with the access key, bucket name and endpoint.
Step 7: Running Home Assistant in Proxmox? Add VM Backups Too
If you followed our Home Assistant in a Proxmox VM guide, you have a second, independent layer available. Proxmox can back up the whole VM (disk, OS and all) with its built-in backup jobs (Datacenter → Backup) to local storage, an NFS/SMB share or a Proxmox Backup Server. Our guide to sharing a NAS drive with Proxmox shows how to add that NFS or SMB share as backup storage.
The two layers do different jobs:
- Home Assistant backups are portable. They restore onto any Home Assistant OS install, on any hardware, and let you restore just one app or folder.
- Proxmox VM backups are the fastest way back from a broken OS or a bad host update: restore the VM and it boots exactly as it was. They only restore to Proxmox, though.
Use both. A weekly VM backup plus daily Home Assistant backups is a solid combination. Install the QEMU guest agent app in Home Assistant and enable the agent in the VM’s options so Proxmox can take consistent snapshot-mode backups without shutting the VM down.
Step 8: Restore to a Running Home Assistant Instance
This is for when Home Assistant still runs but something has gone wrong: a bad update, a broken integration, a mangled automation. It’s the easiest restore path.
- Go to Settings → System → Backups and select Show all backups.
- If the backup isn’t listed (for example, you only have a downloaded copy), open the three-dot menu at the top right of the My backups list, choose Upload backup and select the
.tarfile. - Select the backup to open its detail page.
- Choose what to restore. Your current system is overwritten with the parts you pick. To roll back everything, select all folders and apps; to fix one problem, select only what you need (for example, just Settings and history). Then select Restore, which stays greyed out until you tick something.
- If the backup is encrypted, enter the key from your emergency kit.
- Confirm. Home Assistant restarts and the UI is unavailable while it works. For a small install that is a few minutes; a large one, where Core and every app are reinstalled, can take around 45 minutes.
- Log in with the username and password as they were when the backup was taken.
- Check your dashboards, a few automations and your integrations, then make a fresh backup as your new baseline.
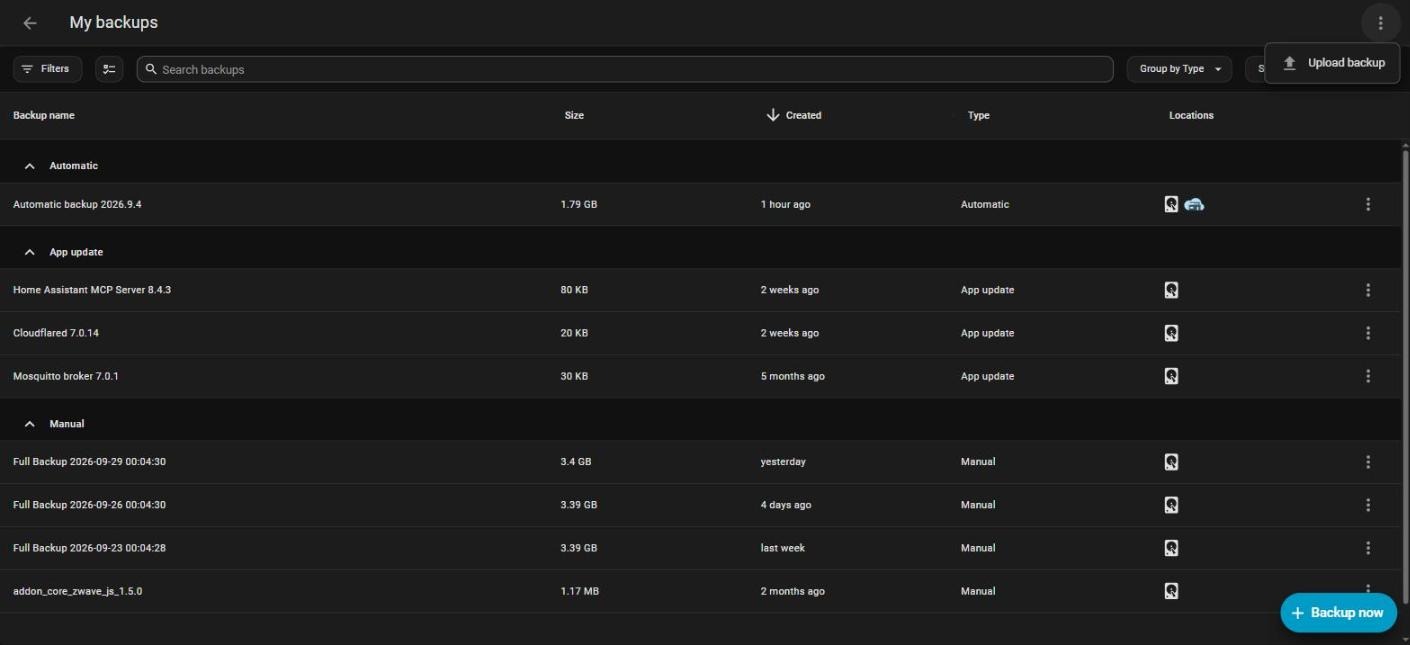
.tar file saved elsewhere.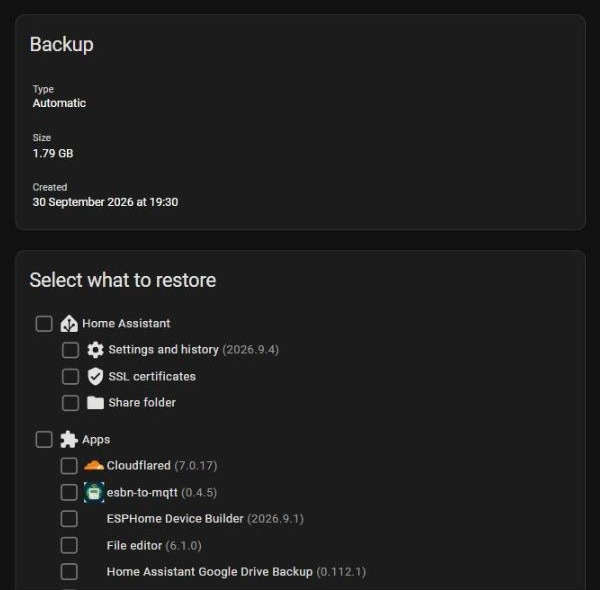
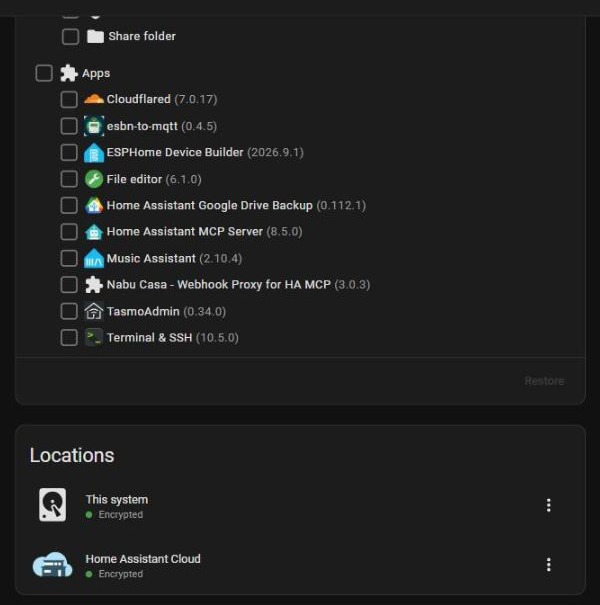
A restore overwrites what you chose to restore. Anything changed since the backup was taken, in those parts, is lost. That is the point of a restore, but pick the backup carefully.
Step 9: Restore to Fresh Hardware (Migration or Dead Machine)
This is for moving to a new mini PC, replacing a dead SD card, or rebuilding after a hardware failure. Home Assistant handles it during onboarding, and the old and new devices don’t need to be the same type: moving from a Raspberry Pi to a mini PC works.
Before you start:
- Have the backup file (or your Home Assistant Cloud login) and your emergency kit to hand.
- Make sure the new device has more free space than the old one used. The backup file size is no guide; check Settings → System → Repairs → ⋮ → System information → Home Assistant Supervisor → Disk used on the old system if you still can.
- Plug your Zigbee, Z-Wave or Thread radios into the new device before restoring.
- Install Home Assistant OS on the new device using the official instructions for your hardware (or, on Proxmox, a new VM as in our Proxmox VM guide).
- Boot it and wait for the first-time setup to finish; it downloads the latest components, which can take a while.
- From a computer on the same network, open
http://homeassistant.local:8123. If that doesn’t resolve, find the device’s IP address in your router and usehttp://<IP-ADDRESS>:8123. - On the welcome screen, choose Upload backup and select your
.tarfile (it can come from any drive your computer can reach, including a network share), or choose Home Assistant Cloud and sign in to restore your cloud backup. - Select what to restore; to migrate everything, select all.
- Enter the key from your emergency kit and select Restore backup. Don’t refresh the page. The system shuts down, is wiped and reinstalled from the backup, so it will be unreachable for a while.
- Log in with the username and password from the old system.
After the restore:
- Reconnect any network storage you had on the old system; it may not come back on its own.
- Check that your radios came back. If the new device has its own built-in Zigbee radio that you now want to use, that is a different coordinator and needs a proper Zigbee migration rather than a restore.
- Wake battery-powered devices that show as unavailable.
- Set the static IP or DNS entry you want, and check the mobile app still connects.
- Make a fresh backup on the new hardware so your backup chain starts there.
Stick to the same installation type when migrating. Restoring a Home Assistant OS backup onto a Container install is not supported.
Step 10: Radio Networks: What Backups Do and Don’t Cover
A backup restores the software layer. The radios are physical hardware, and a little documentation now saves a lot of pain later.
- Zigbee: the network key, device database and coordinator backup are all in your Home Assistant backup (see Step 1). Restore with the same coordinator plugged in and devices reconnect without re-pairing. If you use a stable
/dev/serial/by-id/...path, as recommended in our Zigbee2MQTT setup guide, the path won’t change between machines. Moving to a different coordinator uses the coordinator backup to migrate the network; check the ZHA or Zigbee2MQTT migration docs first. If you are choosing a new coordinator, our Best Zigbee Hub for Home Assistant guide covers the options. - Z-Wave: the network lives largely on the controller stick itself, so move the same stick to the new hardware. Note its model and firmware version.
- Thread and Matter: after a restore, check your Thread border routers are online and your Matter devices respond. Our Best Thread Border Router for Home Assistant guide explains how border routers fit into a local setup.
Keep a short plain-text note outside Home Assistant listing each coordinator’s brand, firmware version, device path and the integration that uses it. The backup restores the software; that note covers everything else.
Quick Reference: Backup Strategy Summary
| What | When | Where it lives |
|---|---|---|
| Automatic backup | Daily, scheduled | Local + at least one off-device location |
| Pre-update backup | Every Home Assistant or app update | Automatic if enabled in Step 5 |
| Manual named backup | Before risky changes | Local; download a copy to your computer |
| Proxmox VM backup | Weekly (if running in Proxmox) | NAS share or Proxmox Backup Server |
| Encryption emergency kit | Once; again if you change the key | Password manager or secure place outside Home Assistant |
| Radio coordinator notes | Whenever hardware changes | Plain-text file outside Home Assistant |
FAQ
Can I restore a Home Assistant backup to different hardware?
Yes. Install Home Assistant OS on the new device, then choose Upload backup (or Home Assistant Cloud) on the welcome screen. Moving from a Raspberry Pi to a mini PC or a Proxmox VM is fully supported. Make sure the new device has more free space than the old one used, and stay on the same installation type.
What happens if I lose my encryption key?
You won’t be able to restore any backup that is still encrypted, and there is no reset. That is why the emergency kit in Step 4 isn’t optional. One saving grace: backups you downloaded from the Backups page are decrypted on download, so a copy you saved to your computer that way can still be restored without the key. Don’t rely on that; keep the kit safe.
Does a Home Assistant backup include my Zigbee pairings?
Yes. ZHA stores its database in the config folder, and Zigbee2MQTT stores its data (including the network key and coordinator backup) in /homeassistant/zigbee2mqtt. Both are included in a full backup. Restore with the same coordinator connected and your devices reconnect without re-pairing. Use the stable /dev/serial/by-id/... path rather than /dev/ttyUSB0 so the path survives the move to new hardware.
How big will my backups be?
It varies with your history database and what you include. A setup with a default 10-day history and media left out is often a few hundred megabytes; a long history or a media library can push it to several gigabytes. Check Settings → System → Repairs → ⋮ → System information for the estimated database size, and trim the recorder’s retention if backups are ballooning.