
The Homelab Bench is reader-supported. As an Amazon Associate we earn from qualifying purchases; this article contains affiliate links.
By the end of this guide you will have a running virtual machine and a running LXC container inside Proxmox VE. Every setting in both wizards is explained so you know what you clicked and why — no prior Proxmox experience needed.
New to Proxmox entirely? Start with our guide to installing Proxmox and finding your way around the interface first — this piece picks up right where that one leaves off.
VM vs LXC Container: Which One Do You Need?
Proxmox gives you two ways to run workloads, and choosing the wrong one costs you RAM for no reason. Here is the short version before you open a single wizard.
Virtual Machines (KVM/QEMU) run a complete operating system with their own kernel on emulated hardware. They are the right choice when you need to run Windows, when you need strong isolation between workloads, or when an application’s documentation assumes a dedicated Linux kernel.
LXC Containers share the Proxmox host’s Linux kernel and run an isolated user space on top of it. Because they do not boot a full kernel or emulate hardware, they are dramatically lighter on RAM and CPU than VMs.
The practical rule for a homelab: run a single Ubuntu or Debian VM as your Docker host. Docker inside an LXC container requires privileged mode, which weakens isolation, and the resulting LXC-in-LXC nesting gets messy. A VM gives Docker a clean, isolated Linux environment that behaves exactly as documented. For everything else that is Linux-only and lightweight — Pi-hole, a reverse proxy, small self-hosted apps — an LXC container is the better tool. One hard limit: you cannot run Windows or any non-Linux operating system inside an LXC container.
If you are still deciding what hardware to run Proxmox on, our mini PC comparison for Proxmox homelabs covers five options across budget, mid-range, and premium — a mini-PC with at least 16 GB of RAM and an NVMe SSD gives you enough headroom for a healthy mix of VMs and containers.
Orienting Yourself: The Proxmox Web Interface
Before you click anything, spend 60 seconds learning where things live. Log in to the Proxmox web interface at https://your-server-ip:8006. You will see three main regions:
- Left sidebar (Server View) — a tree showing your Datacenter node, then your individual Proxmox host (often named pve), and beneath it all your storage pools, VMs, and containers. Click anything here to select it.
- Centre panel — shows the detail tabs (Summary, Console, Hardware, Options, etc.) for whatever you have selected in the sidebar.
- Top-right toolbar — the Create VM and Create CT buttons live here. They are always visible regardless of what is selected on the left.
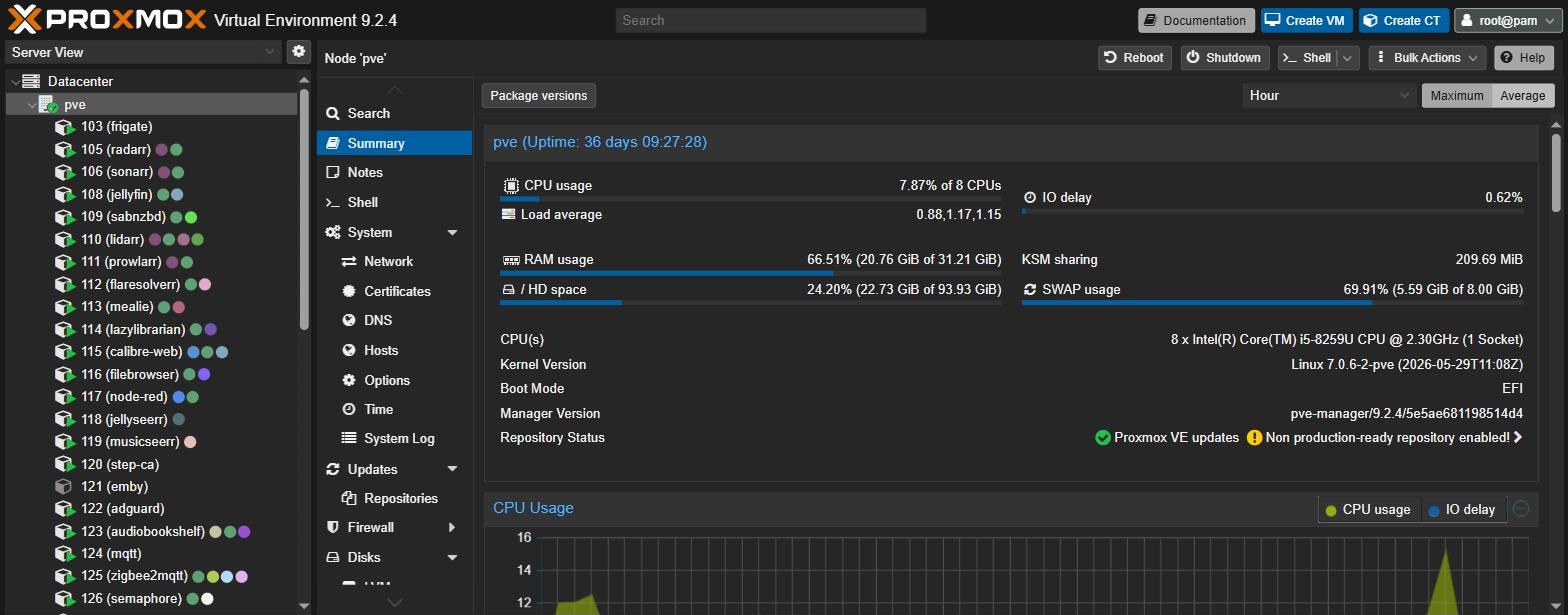
When you select a node in the left sidebar and then click local storage underneath it, the centre panel switches to showing that storage’s contents with tabs for Summary, ISO Images, CT Templates, and Backups. You will be visiting those tabs in the steps below.
Part 1: Creating Your First VM
Step 1 — Upload an ISO Image
To create a virtual machine in Proxmox VE you need two things: a working Proxmox installation and an ISO image of the operating system you want to install. This guide uses Ubuntu Server 24.04 LTS as the example, but the wizard is identical for any Linux distribution or Windows.
- Download the Ubuntu Server ISO from ubuntu.com to your laptop or desktop.
- In the Proxmox sidebar, click your node name, then click local storage beneath it.
- In the centre panel, click the ISO Images tab.
- Click the Upload button at the top of the screen. Click Select File… on the popup and choose the ISO from your local drive, then click Upload.
- Alternatively, if you have a direct download URL, click Download from URL and paste it in — Proxmox will pull the file directly to the server without routing it through your laptop.

A progress bar will appear. The upload time depends on your network speed and the ISO size. Wait until it completes before moving on.
Step 2 — Open the VM Creation Wizard
Select your Proxmox node in the left sidebar and click Create VM in the top-right corner. This opens the VM creation wizard, which is organised into tabs. Click Next to advance through each one.
Step 3 — General Tab
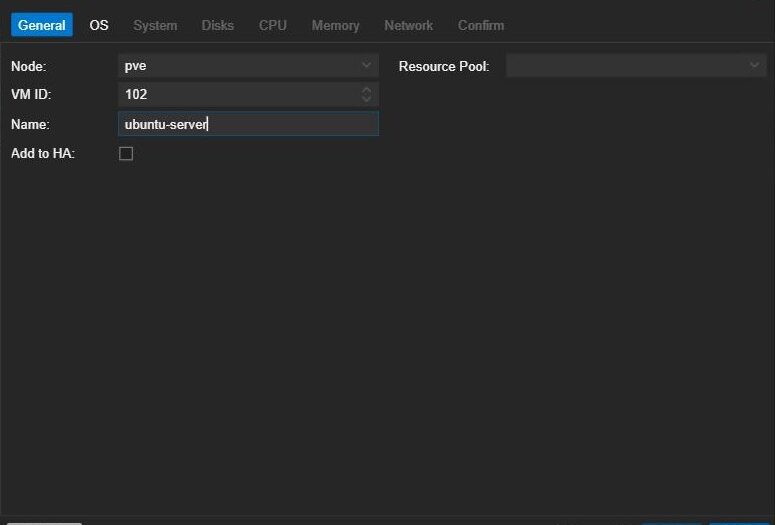
- Node — pre-filled with your host. Leave it.
- VM ID — Proxmox assigns an ID automatically, starting at 100. Change it if you prefer a specific numbering scheme.
- Name — give it something descriptive, like
ubuntu-server. You will thank yourself later when you have twelve VMs in the sidebar. - Start at boot — tick this if the VM should come back up automatically after the Proxmox host reboots. This option only shows when Advanced is ticked at the bottom of the wizard. Leave it unticked for now; you can enable it later under VM → Options.
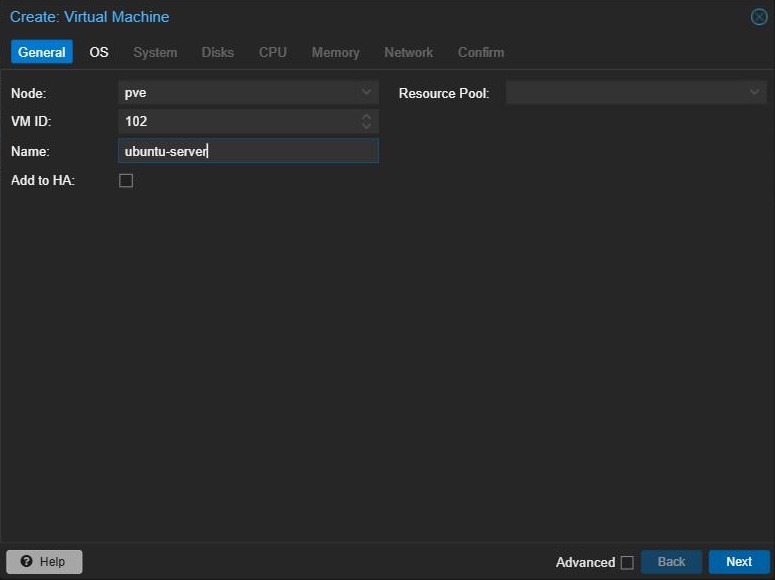
Click Next.
Step 4 — OS Tab
- ISO image — pick the ISO you uploaded from the dropdown. It should appear under local: iso/.
- Type — choose Linux and the appropriate kernel version; the default (shown as 6.x – 2.6 Kernel in older releases and 7.x – 2.6 Kernel in Proxmox 9) is right for any modern distribution.
- Version — match it to your ISO. This is not critical for boot but setting the correct OS type lets Proxmox optimise low-level parameters — for instance, Windows expects the BIOS clock to use local time, while Unix-based systems expect UTC.
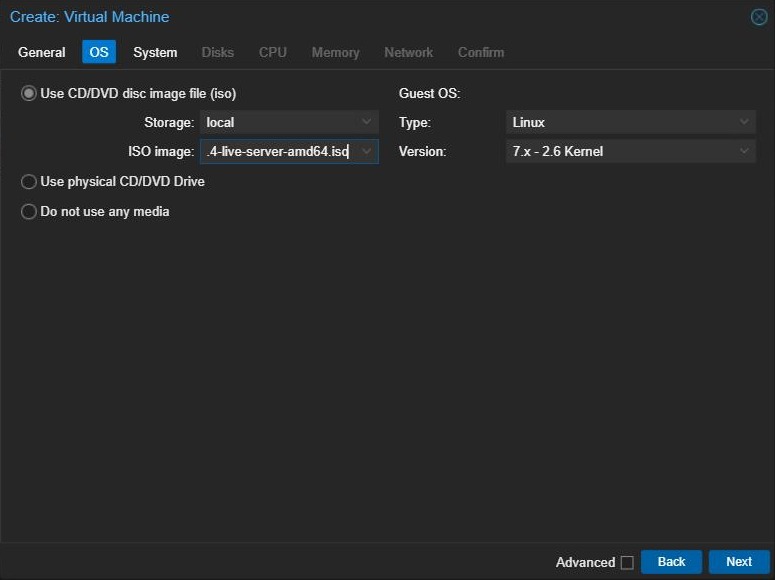
Click Next.
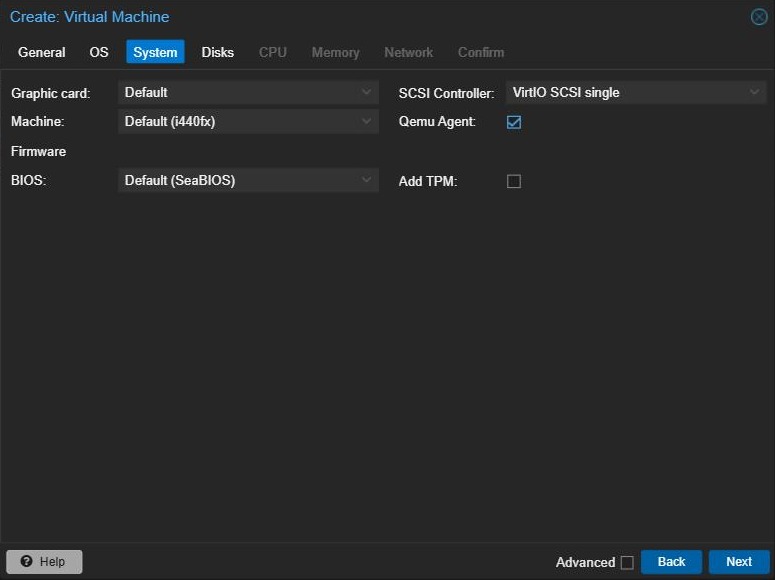
Step 5 — System Tab
This is where beginners usually accept defaults without reading them. Don’t.
- Machine — change this from the default i440fx to q35, which is recommended for modern operating systems and required if you ever want to do PCIe passthrough.
- BIOS — use OVMF (UEFI) for modern systems. When you select it, an Add EFI Disk option appears. Leave it ticked and pick a storage (usually local-lvm) for the small EFI disk.
- SCSI Controller — leave this as VirtIO SCSI single, the default, for the best disk performance.
- Qemu Agent — check this box. You will install the agent software inside the VM after the OS is running. The QEMU Guest Agent is a small daemon that runs inside the VM and lets Proxmox communicate directly with the guest OS — it is what makes graceful shutdowns, IP address reporting in the Summary panel, and filesystem-consistent backups all work. Without it, Proxmox can only interact with the VM at the hypervisor level.
Click Next.
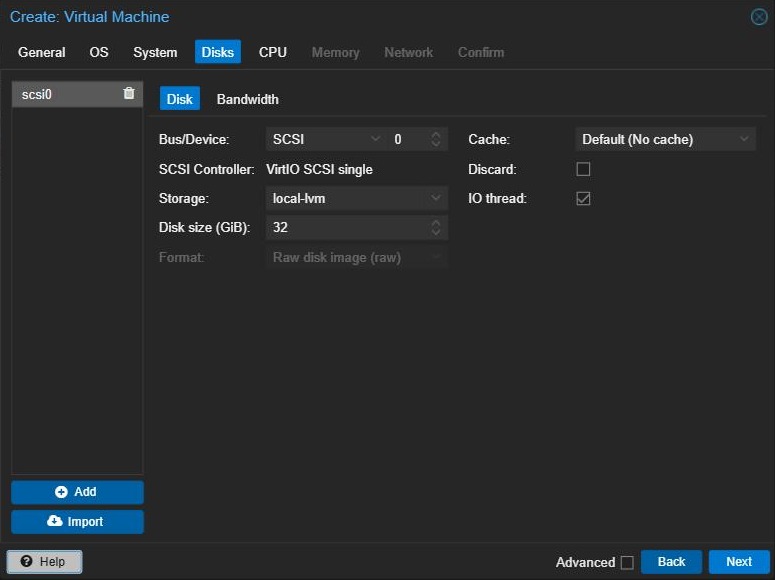
Step 6 — Disks Tab
- Bus/Device — leave as SCSI. It uses the VirtIO stack you set in the previous tab and delivers near-native disk performance.
- Storage — select where the virtual disk lives. On a typical single-node homelab setup this is local-lvm.
- Disk size (GiB) — for a Ubuntu Server VM, 32 GiB is a comfortable starting point. You can increase a disk later but cannot shrink it without extra steps, so do not wildly over-provision.
- Cache — leave as Default (No cache) for safety. Write back is faster but risks data loss on power failure without a battery-backed controller.
- Discard — tick this if your Proxmox host has an SSD. It passes TRIM commands through, keeping SSD performance healthy over time.
Click Next.
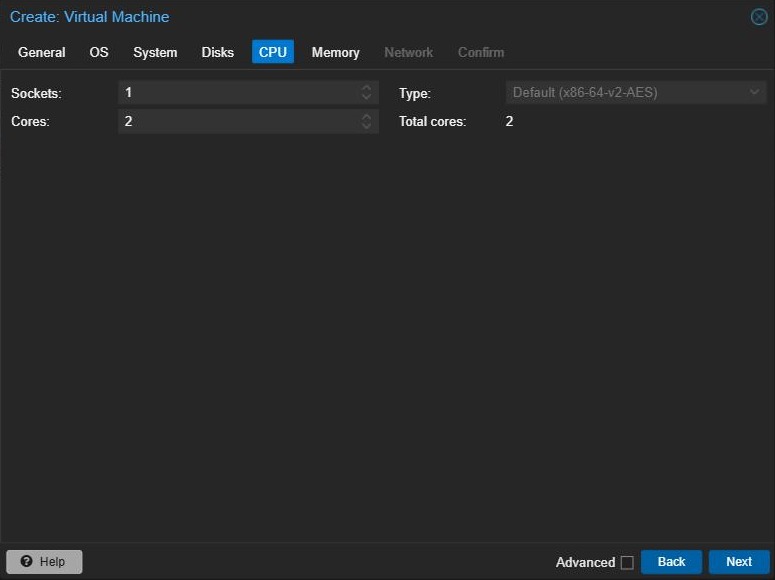
Step 7 — CPU Tab
- Sockets — leave at 1 for almost all homelab VMs.
- Cores — start with 2 for a general-purpose Linux server. You can change this while the VM is stopped.
- Type (CPU model) — the UI default is x86-64-v2-AES, which is compatible with Intel CPUs from Westmere onwards and equivalent AMD generations. For a single-node homelab where you will never live-migrate VMs to different hardware, set this to host — it passes through all of the real CPU’s instruction set flags for maximum performance. If you plan to build a multi-node cluster with different CPU generations later, keep x86-64-v2-AES for portability.
Click Next.
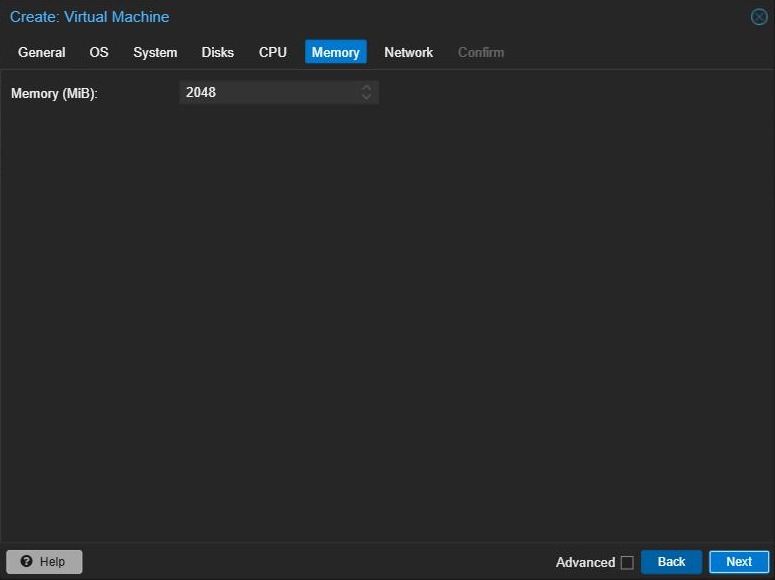
Step 8 — Memory Tab
- Memory (MiB) — for Ubuntu Server, 2048 MiB (2 GiB) is a workable minimum. Set it to 4096 MiB if your host has RAM to spare.
- Ballooning Device — visible once Advanced is ticked. Leave it enabled. The balloon driver lets Proxmox reclaim unused RAM from the VM when the host is under pressure. All Linux distributions released in the last decade include this driver.
- Minimum memory — if you enable ballooning, set a floor here so the VM is never starved. Half the maximum you allocated is a reasonable starting point.
Click Next.
Step 9 — Network Tab
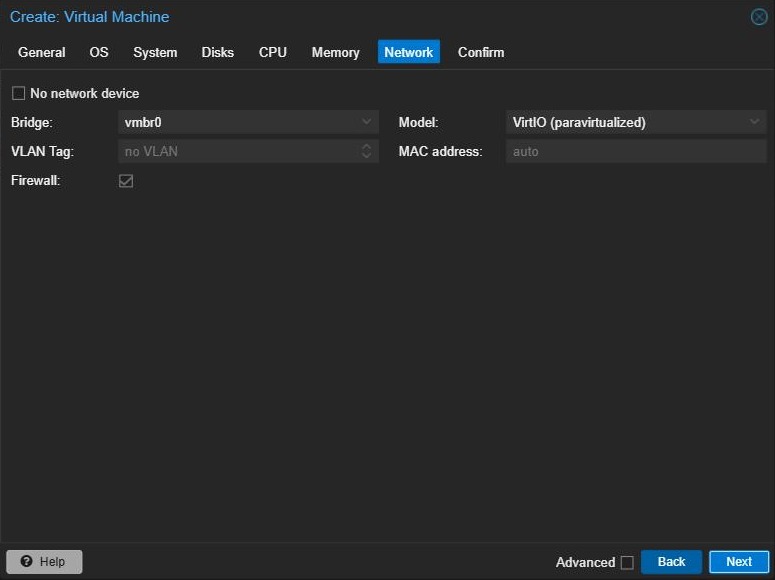
- Bridge — leave as vmbr0. This is the default Linux bridge Proxmox creates on install, giving the VM access to your LAN.
- Model — leave this as VirtIO (paravirtualized), the default. It delivers better throughput and lower CPU overhead than the emulated Intel e1000 or RTL8139 adapters, and Linux kernels include the driver out of the box.
- Firewall — this box is ticked by default, but it has no effect until you enable the firewall at the Datacenter level. Leave it as is and configure the firewall separately once the VM is running.
Click Next.
Step 10 — Confirm Tab and First Boot
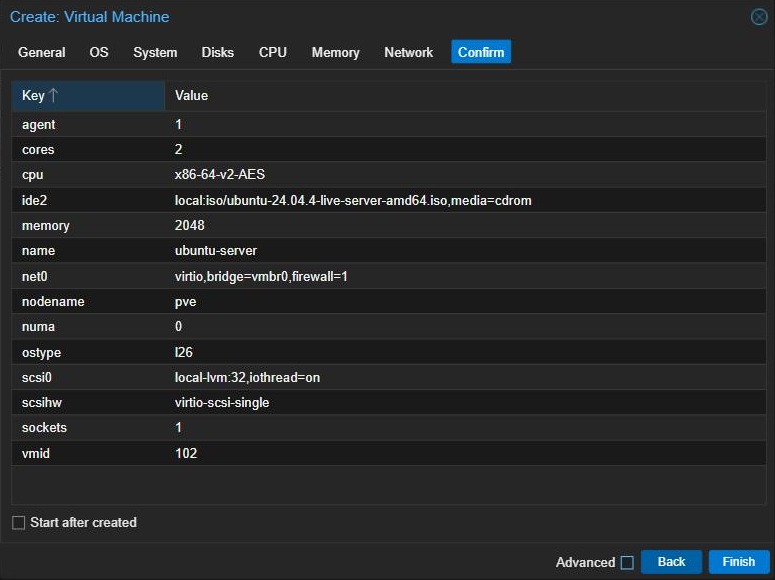
Review the summary on the Confirm tab to make sure everything looks right, then click Finish. The VM will be created and will appear in the left sidebar under your node.
To start it:
- Click the VM name in the sidebar to select it.
- Click the Start button at the top of the screen.
- Click the Console button and select noVNC. A browser-based console window opens and you will see the OS installer boot.
- Follow the Ubuntu installation steps normally. When the installer finishes and reboots, log in and install the QEMU Guest Agent: run
sudo apt update && sudo apt install qemu-guest-agent -y, then reboot. The VM’s IP address will now appear in its Summary tab in Proxmox.
If you are running Home Assistant OS as a VM — a good way to get more USB passthrough flexibility than a single-board computer offers — the same wizard applies. Use the Home Assistant OS QCOW2 image instead of an ISO. For guidance on choosing a Zigbee integration once Home Assistant is running, see our guide to the best Zigbee hub for Home Assistant.
Part 2: Creating Your First LXC Container
Once you have a VM under your belt, the container workflow is noticeably faster. The key difference is that instead of an ISO you use a template — a compressed root filesystem for a Linux distribution.
Step 1 — Download a Container Template
A template is a compressed root filesystem for a distribution — Debian, Ubuntu, Alpine, and so on. You download it once per node and reuse it for every container you create from that distribution.
- In the left sidebar, click your node, then click local storage.
- In the centre panel, click the CT Templates tab.
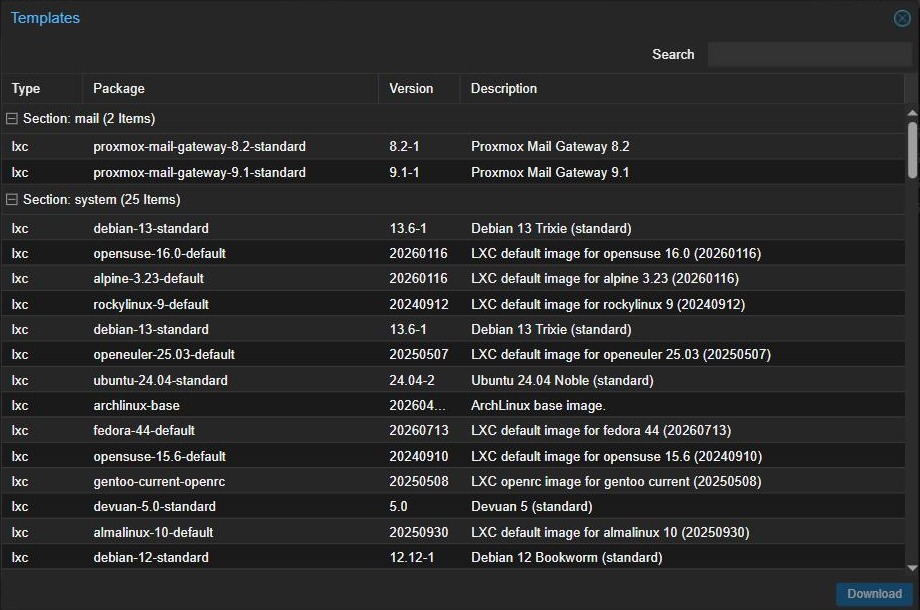
- Click the Templates button. A window opens listing the available LXC container templates.
- Proxmox provides templates for Ubuntu, Debian, AlmaLinux, Rocky, Alpine, OpenSUSE, and others. For a first container, search for debian-12 — it is the leanest and most predictable base for homelab services.
- Select it and click Download. A task log window appears; wait for it to finish before closing it.

Step 2 — Open the LXC Creation Wizard
Click the Create CT button at the top right corner of the interface. A wizard will appear guiding you through the creation steps.
Step 3 — General Tab
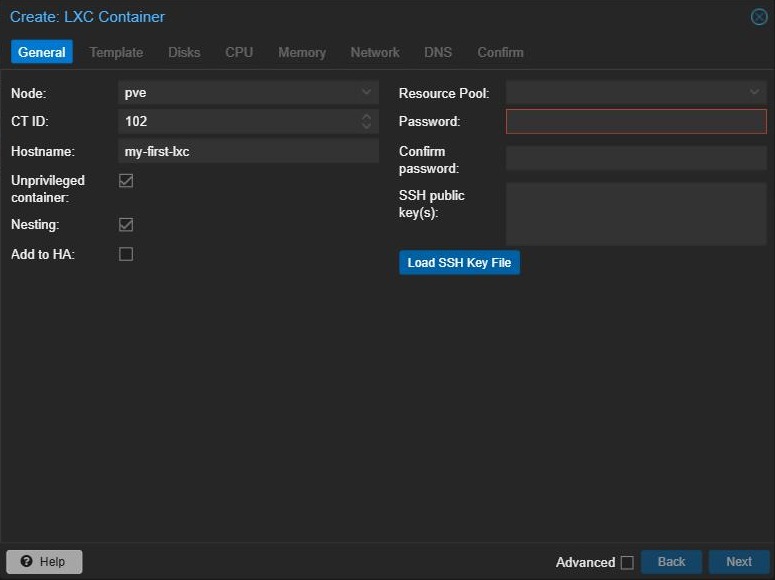
- Node — your host, pre-filled.
- CT ID — auto-assigned, starting at 100 or the next free number.
- Hostname — fill in a hostname and a root password for the container, then confirm the password.
- Unprivileged container — leave this ticked. An unprivileged container maps the container’s root user to an unprivileged user on the host, which is the safer default. Only untick it if a specific application explicitly requires privileged mode.
- Nesting — ticked by default on new unprivileged containers. Leave it on: current systemd-based distributions such as Debian 12 and 13 need it to run properly.
Click Next.
Step 4 — Template Tab
Select your storage (local) and then pick the template you downloaded from the dropdown. It will be named something like debian-12-standard_...tar.zst. Click Next.
Step 5 — Disks Tab
Set a root disk size. 8 GB is a sensible starting point for a small service like Pi-hole or a DNS resolver. For something that will store data, increase it accordingly. Choose the same storage pool you used for your VM’s disk. Click Next.
Step 6 — CPU Tab
For a lightweight service, 1 core is enough to start. Note that LXC containers do not reserve cores the way VMs do — they share the host’s cores dynamically, so a 1-core setting is a ceiling on scheduling priority, not a dedicated allocation. Click Next.
Step 7 — Memory Tab
The default allocation is 512 MB. For most lightweight services that is sufficient. For something more demanding like a media server or a database, use 1024–2048 MB. Click Next.
Step 8 — Network Tab
- Bridge — vmbr0, same as the VM.
- IPv4 — select DHCP to let your router assign an IP, or enter a static IP in CIDR notation (e.g.
192.168.1.50/24) plus a gateway if you want a fixed address.
Click Next.
Step 9 — DNS Tab and Confirm
Leave DNS settings blank to inherit from the host — this is the recommended default. On the Confirm tab, review everything, then click Finish. A pop-up window will display the steps taken during creation. Once all steps are complete you will see a TASK OK notification. Close it.
Step 10 — Start the Container and Log In
- Select the new container in the left sidebar.
- Click Start in the top toolbar.
- Navigate to your node → container name → Console. Log in as the root user with the password you set during creation.
- Run
apt update && apt upgrade -yas your first action to bring the template’s packages up to date.
You now have a running LXC container. A typical idle container uses 40–80 MB of RAM, which means you can run many of them on the same node that might only support a handful of full VMs. If you end up running Home Assistant inside a container or VM and want to expand your smart-home setup, our Zigbee hub vs dongle guide walks through how to attach a Zigbee radio to a Proxmox host and pass it through.
Quick Reference: VM Settings Summary
| Setting | Recommended Value | Why |
|---|---|---|
| Machine type | q35 | Modern chipset, required for PCIe passthrough |
| BIOS | OVMF (UEFI) | Required for Secure Boot and modern OS installs |
| SCSI Controller | VirtIO SCSI Single | Best disk performance for Linux guests |
| CPU Type (single node) | host | Passes real CPU flags for maximum performance |
| CPU Type (multi-node cluster) | x86-64-v2-AES | Portable across different hardware generations |
| Network Model | VirtIO (paravirtualized) | Lower CPU overhead and better throughput than emulated NICs |
| Qemu Agent | Enabled | Graceful shutdown, IP reporting, consistent backups |
| Disk Discard | On (SSD hosts) | Passes TRIM, maintains SSD health |
Frequently Asked Questions
Can I run Docker inside an LXC container on Proxmox?
Docker inside an LXC container requires privileged mode, which weakens the isolation that makes containers safe. It can be made to work, but the standard advice for homelab use is to run Docker inside a dedicated VM instead. A VM gives Docker a clean, isolated Linux environment that behaves exactly as documented. Use LXC containers for native Linux services that do not need Docker.
What is the QEMU Guest Agent and do I really need it?
The QEMU Guest Agent is a small background program that runs inside your virtual machine’s operating system and lets it communicate with the Proxmox host. Practically speaking it enables graceful shutdowns from the Proxmox UI, displays the VM’s real IP address in the Summary tab, and allows filesystem-consistent backups rather than crash-consistent ones. It takes five minutes to install and there is no downside to enabling it.
How do I choose between CPU type “host” and “x86-64-v2-AES”?
If you have a single-node homelab and will never live-migrate VMs to a different physical machine, set the CPU type to host — it passes through all of the real CPU’s instruction set flags for maximum performance. If you have a multi-node cluster where nodes may have different CPU generations, choose the lowest common CPU model across your nodes — x86-64-v2-AES is a safe default that works on Intel hardware from Westmere onwards and comparable AMD generations, and it ensures a VM can move between nodes without crashing due to missing CPU instructions.
7 comments on "Creating Your First VM and LXC Container in Proxmox"
Pingback: Setting Up Proxmox: The Next Step After a Raspberry Pi – The Homelab Bench
Pingback: Accessing a network drive from an LXC (read and write) – The Homelab Bench
Pingback: Picking the best UPS for your homelab – The Homelab Bench
Pingback: Installing home asssistant in a Proxmox VM - The Homelab Bench
Pingback: How to Set Up Zigbee2MQTT in Home Assistant (2026 Guide) - The Homelab Bench
Pingback: Proxmox Windows Share: Connect an SMB Folder (2026 Guide)
Pingback: How to Set Up an IoT VLAN for Home Assistant - The Homelab Bench